分析360加固保免费版,学习逆向技术(此篇未完结)
使用360加固保免费版加固,注意加固时要把签名校验给去除,因为加固之后的app是没有签名的,自己签名之后如果有签名校验,程序可能会闪退
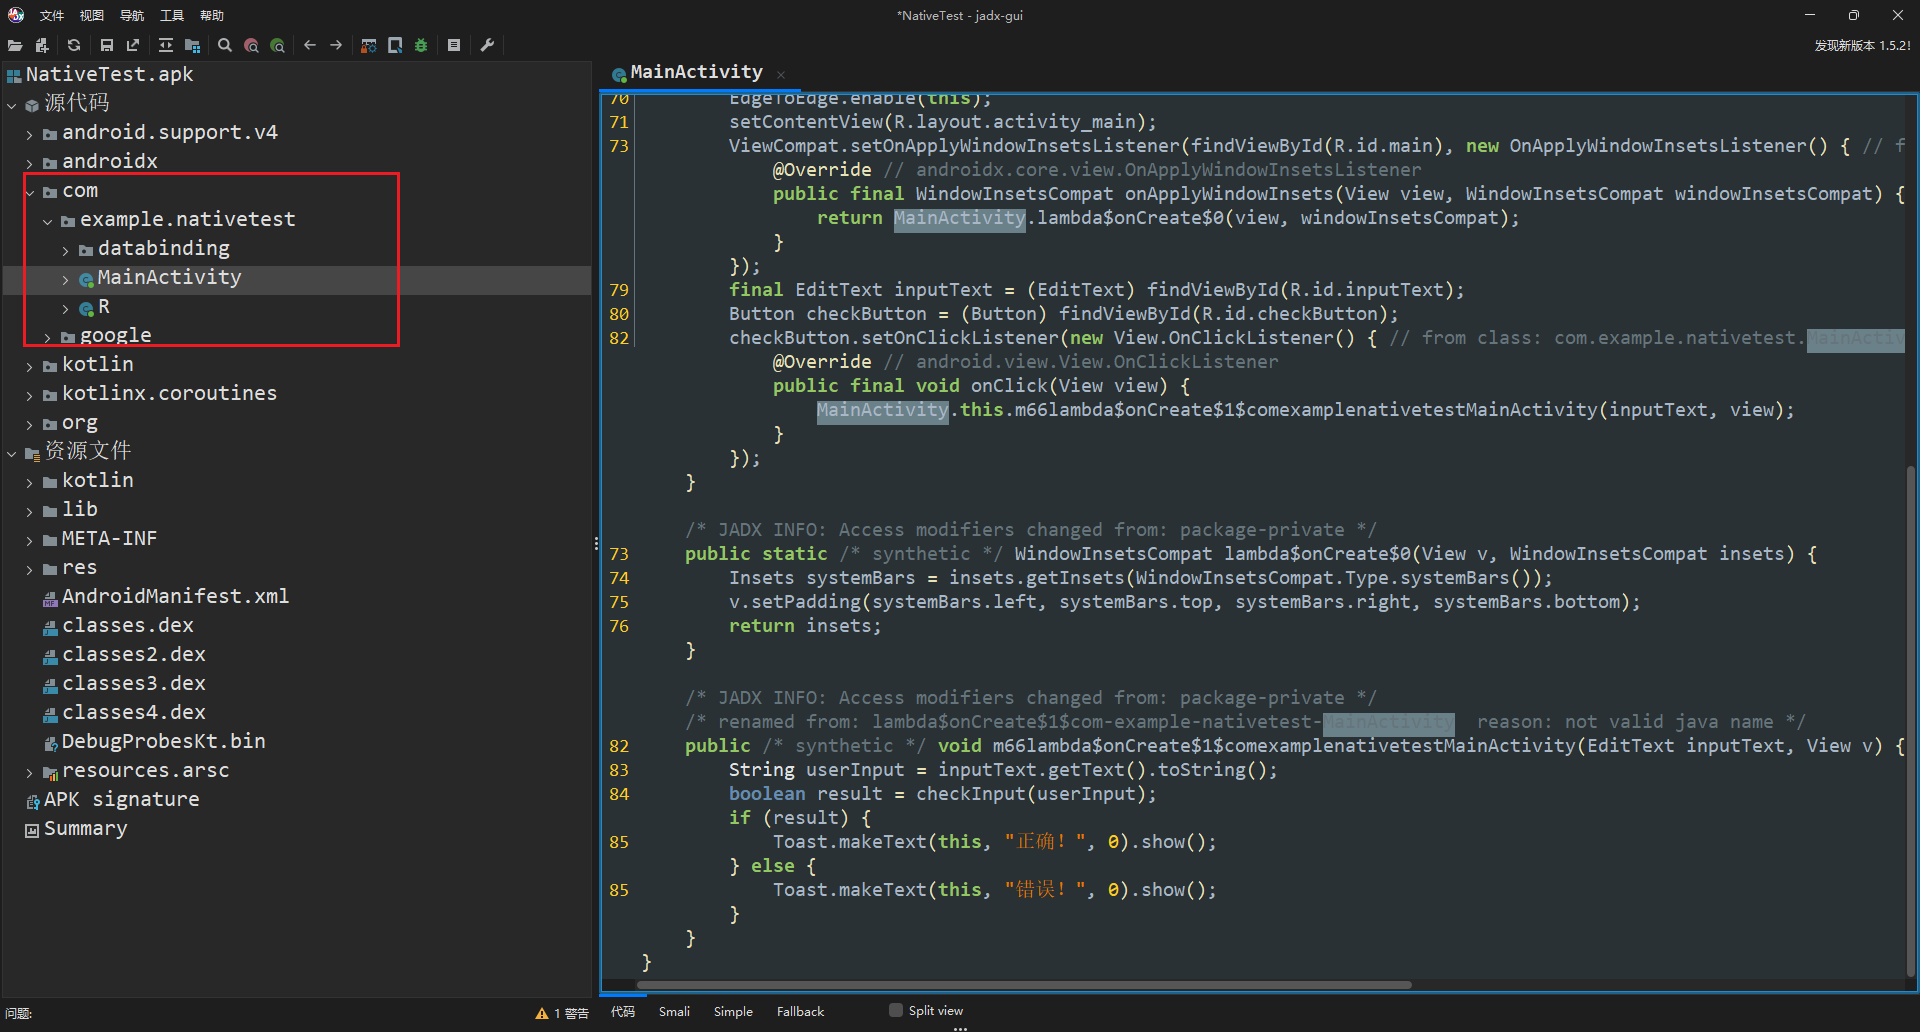
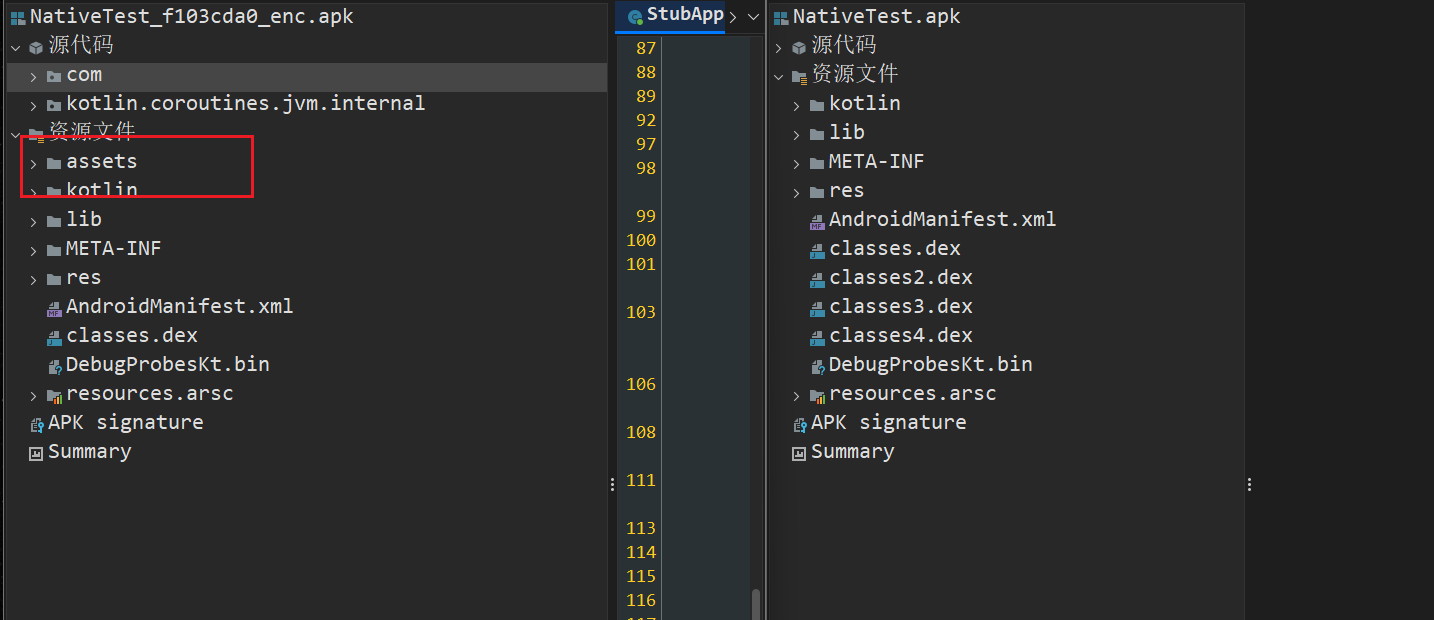
Java层分析 这是我自己写的一个app,可以看到没有加固时可以直接看到MainActivity
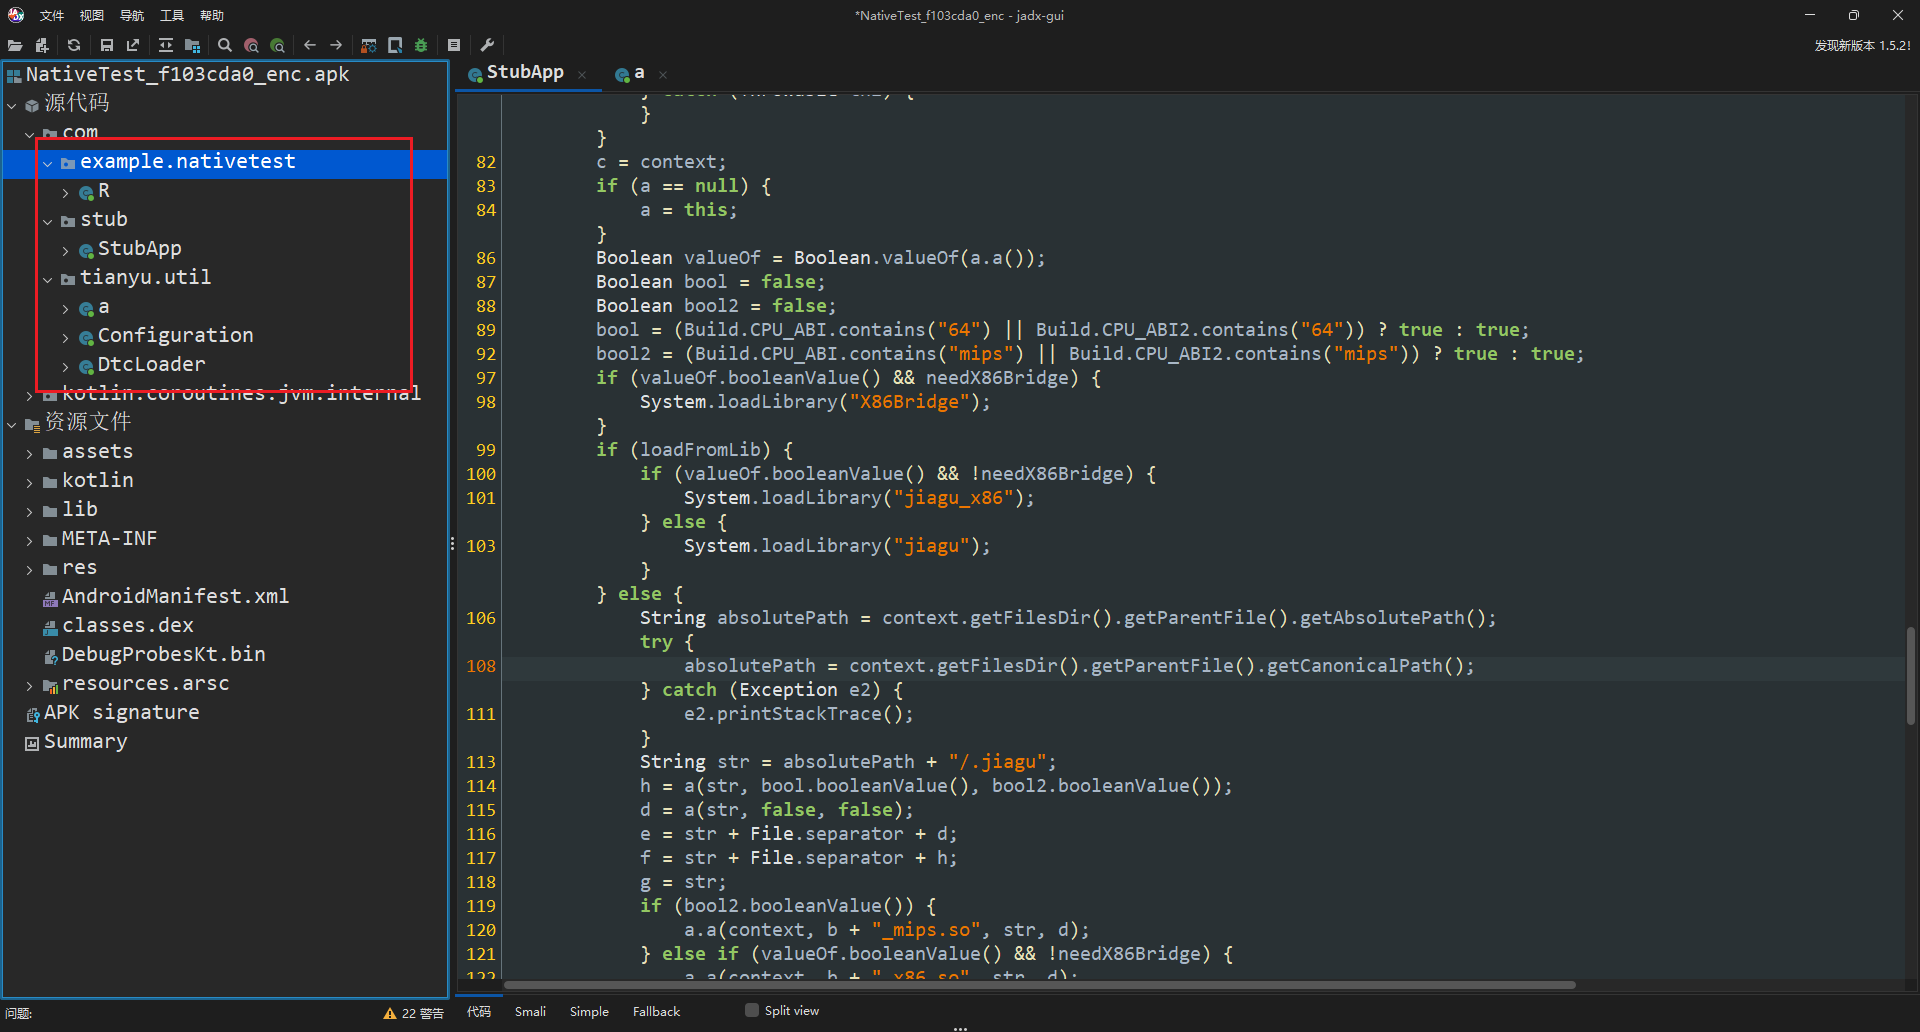
加固之后MainActivity字样没了,出现了StubAPP类和tianyu.util字样,可以知道这就是该加固的特征
StubApp类里面使用a方法传递了一串字符串,跟进a方法,注意a有多个重载方法,需要查看具有一个字符串参数的重载方法
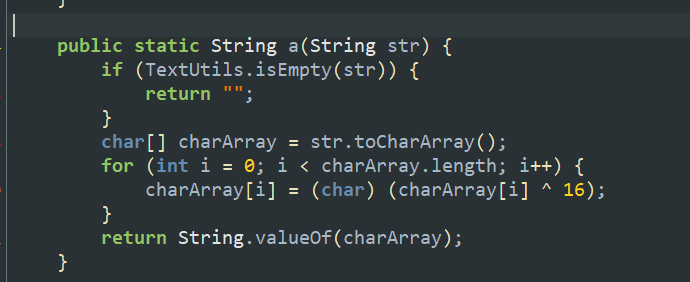
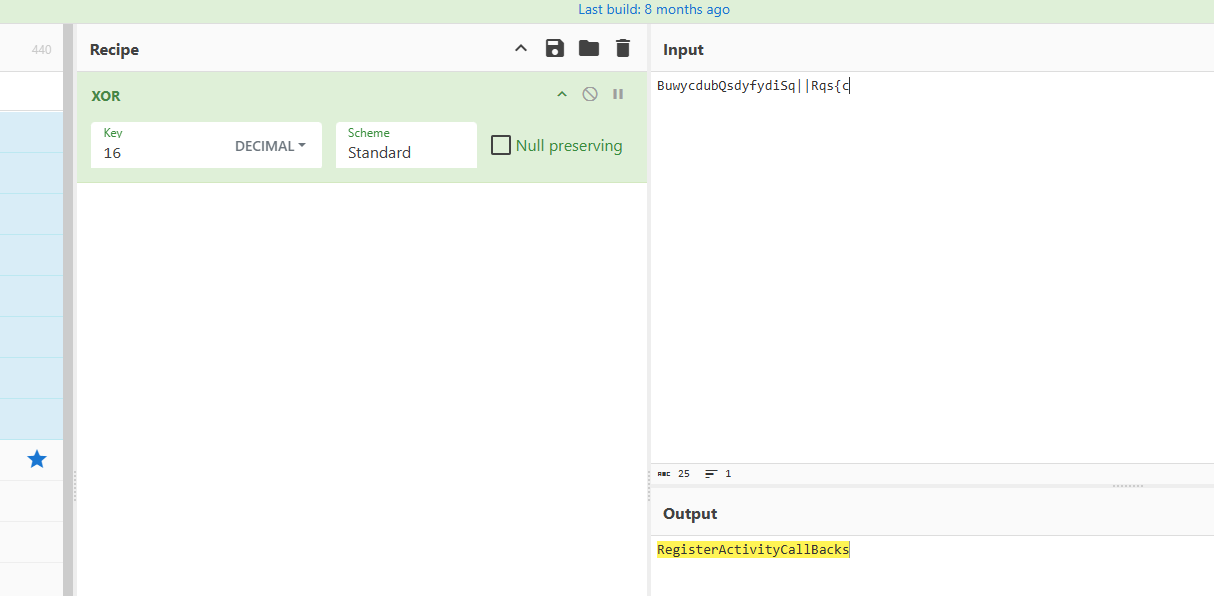
发现就是对字符串进行一个解混淆,方式为异或16,这里可以用Cyberchef先解一下看看
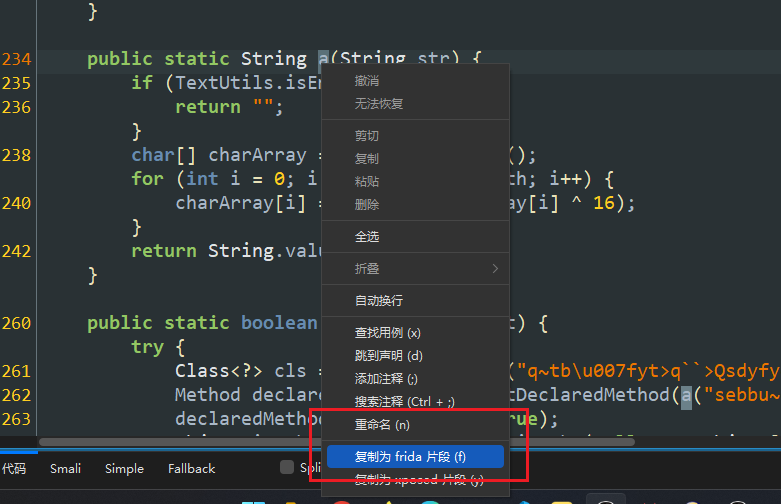
使用Frida hook看看这个方法做了些什么,直接在jadx里选择复制为frida片段
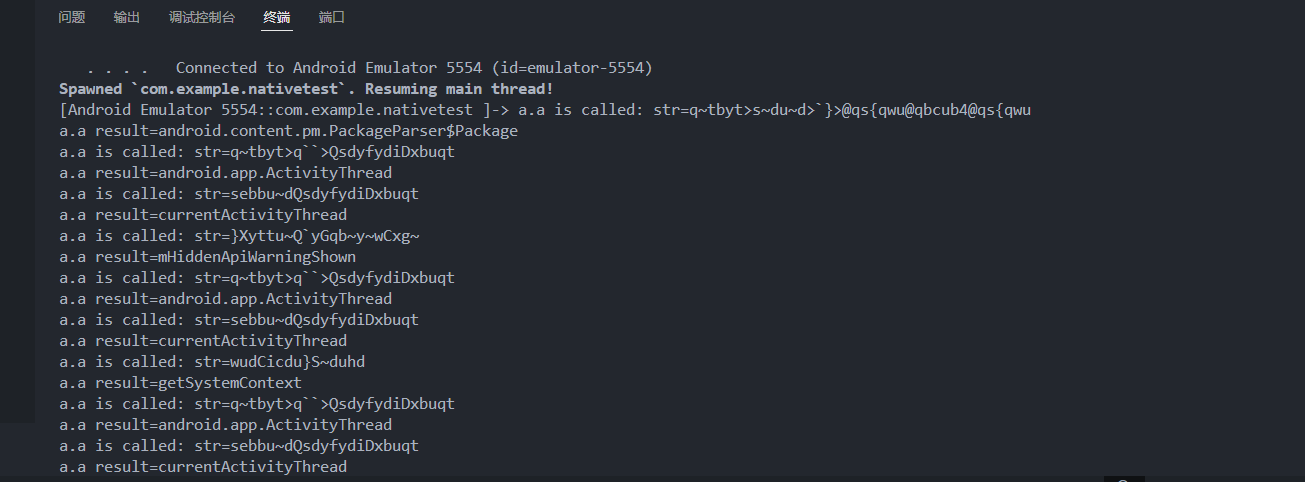
1
2
3
4
5
6
7
8
9
10
11
12
13
14
15
16
17
18
19
function hook (let a = Java .use ("com.tianyu.util.a" );"a" ].overload ('java.lang.String' ).implementation = function (str ) {console .log (`a.a is called: str=${str} ` );let result = this ["a" ](str);console .log (`a.a result=${result} ` );return result;function main (Java .perform (function (hook ();
可以看到就是加载了一些Android系统内部类或方法名
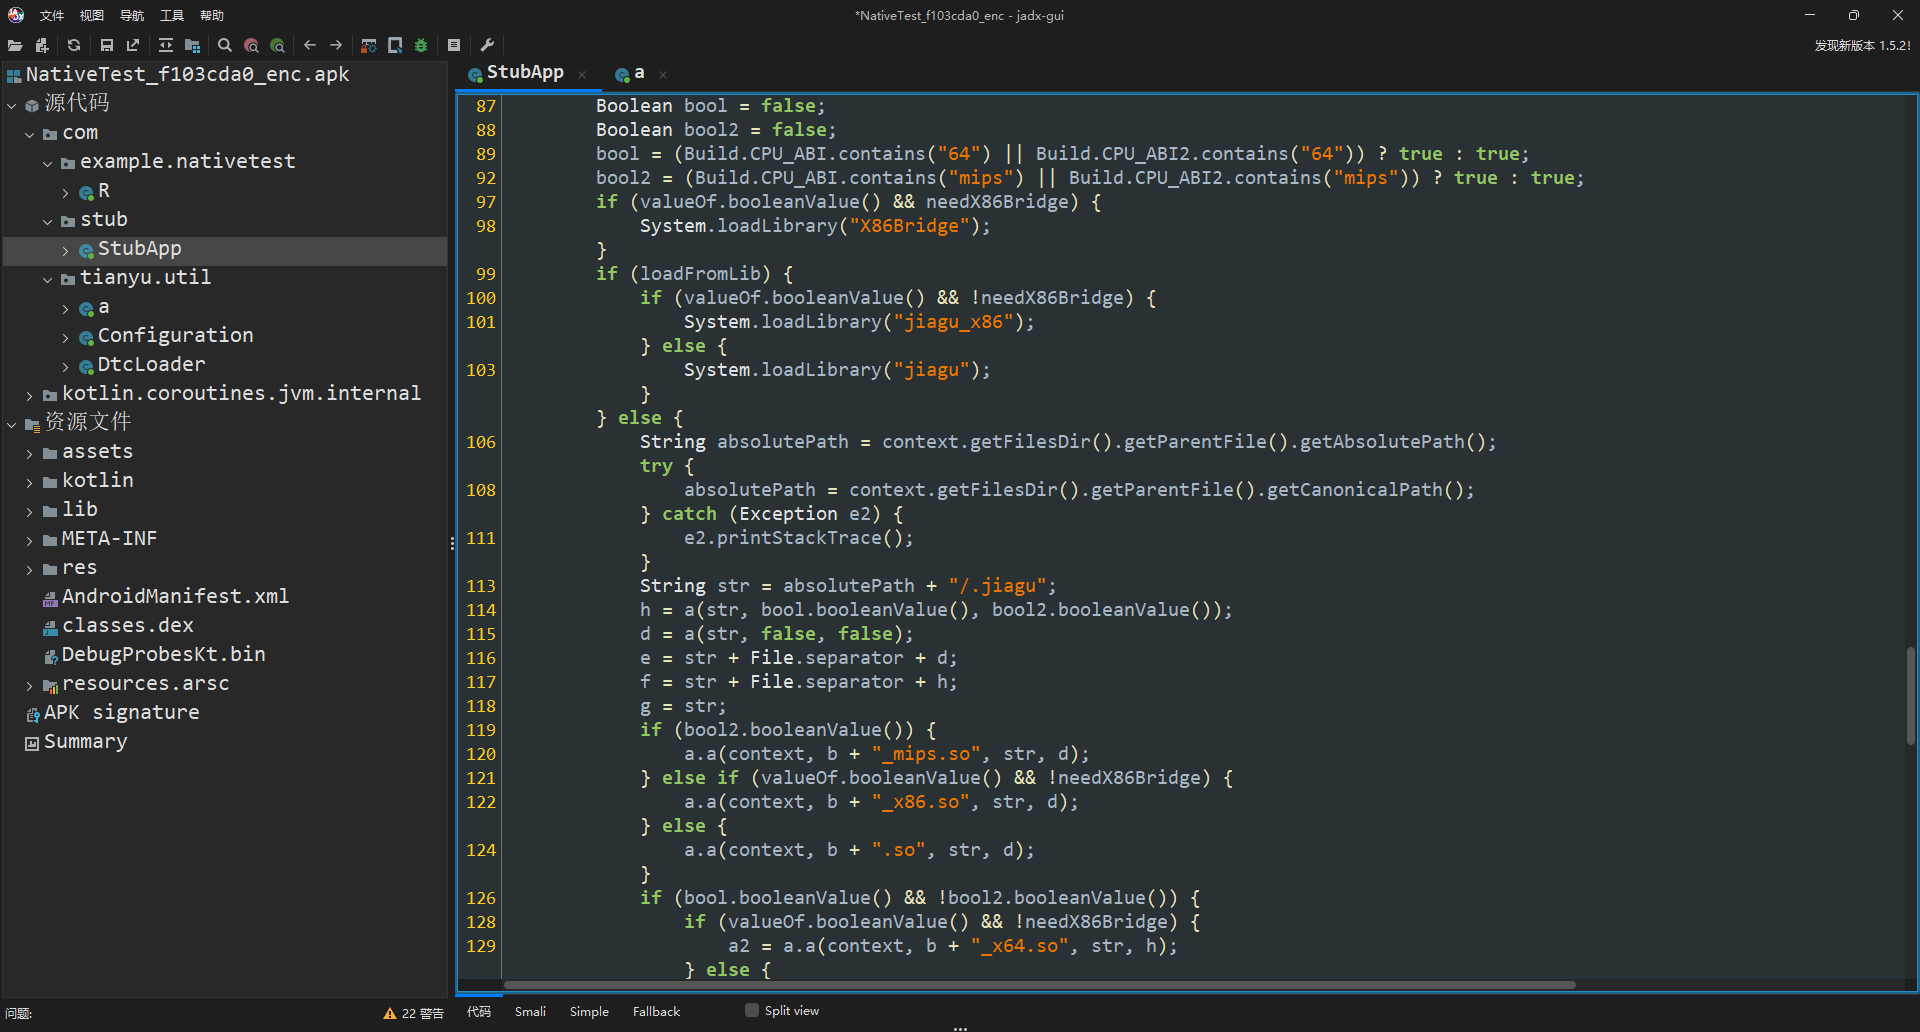
继续观察StubApp类,看见下面会根据设备的架构来加载不同的so文件
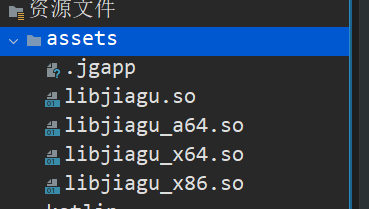
再与正常未加固的apk对比一下,发现加固之后的apk多了一个assets文件夹,里面存着一些so文件
不难分析出,该加固是在Native层来释放dex文件
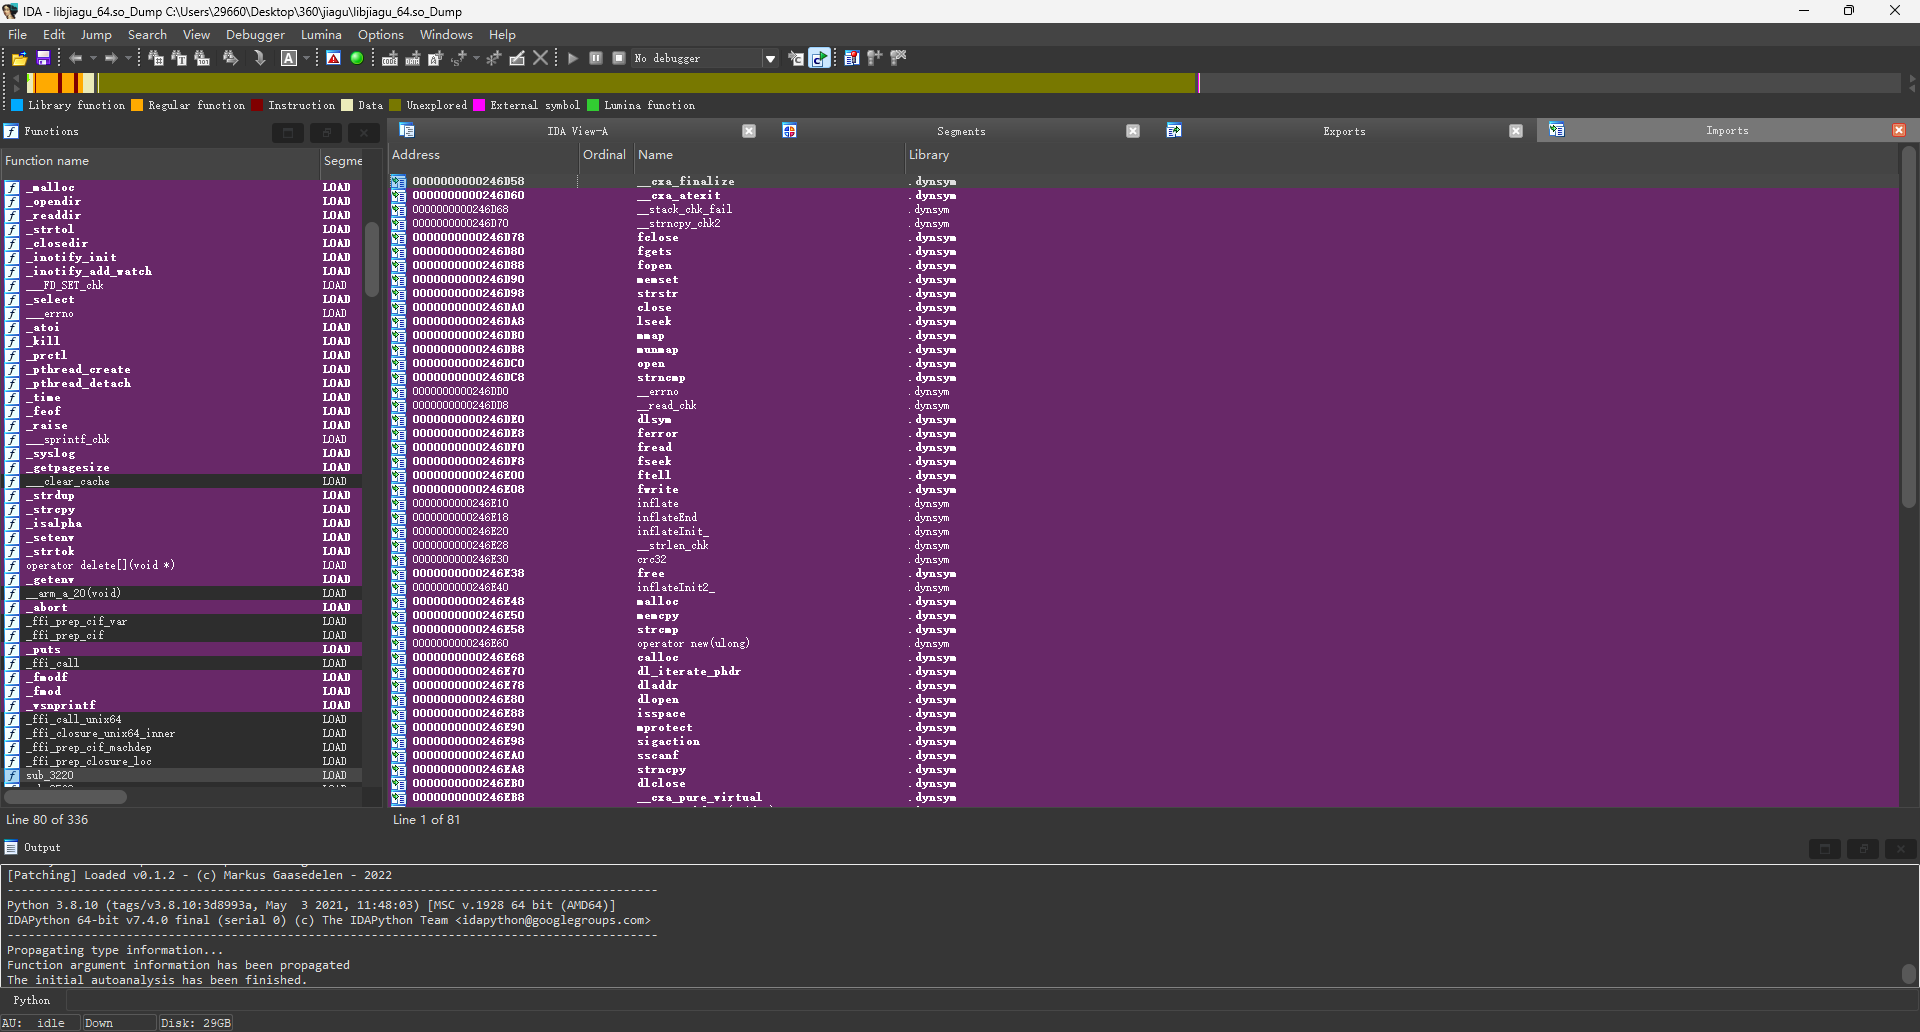
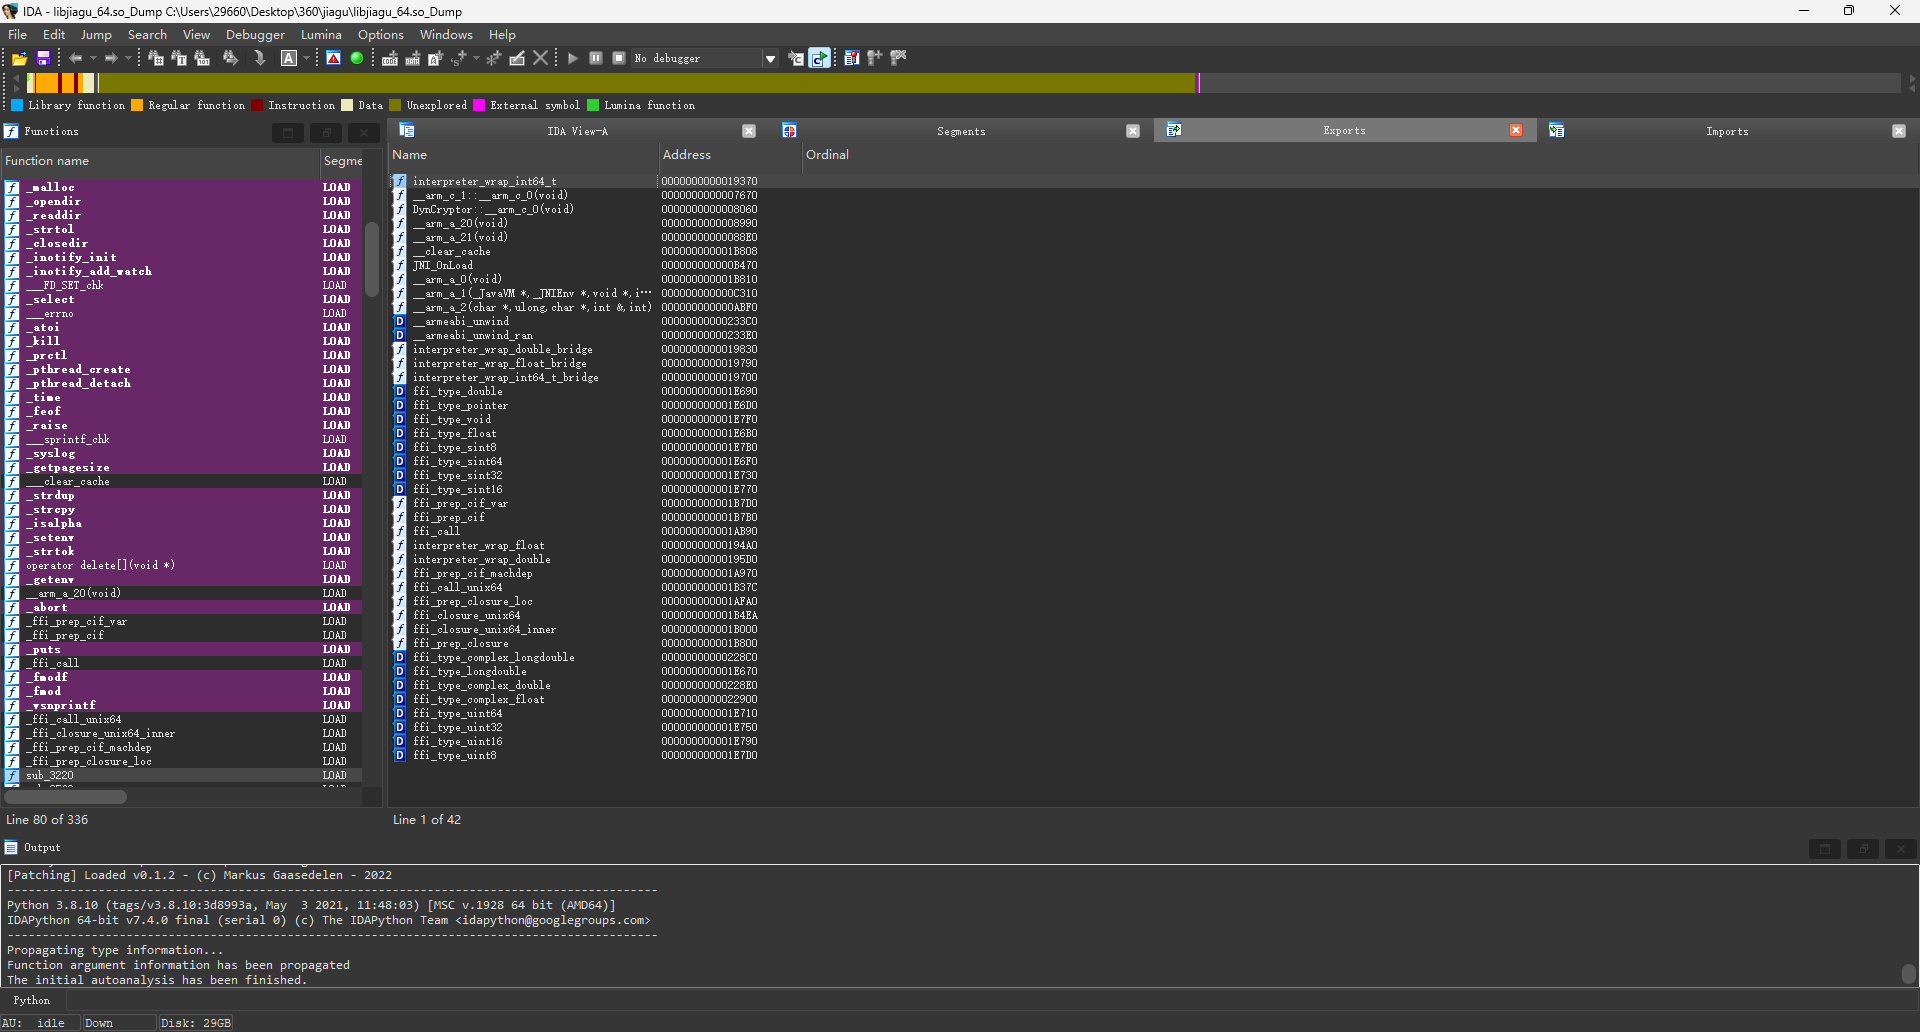
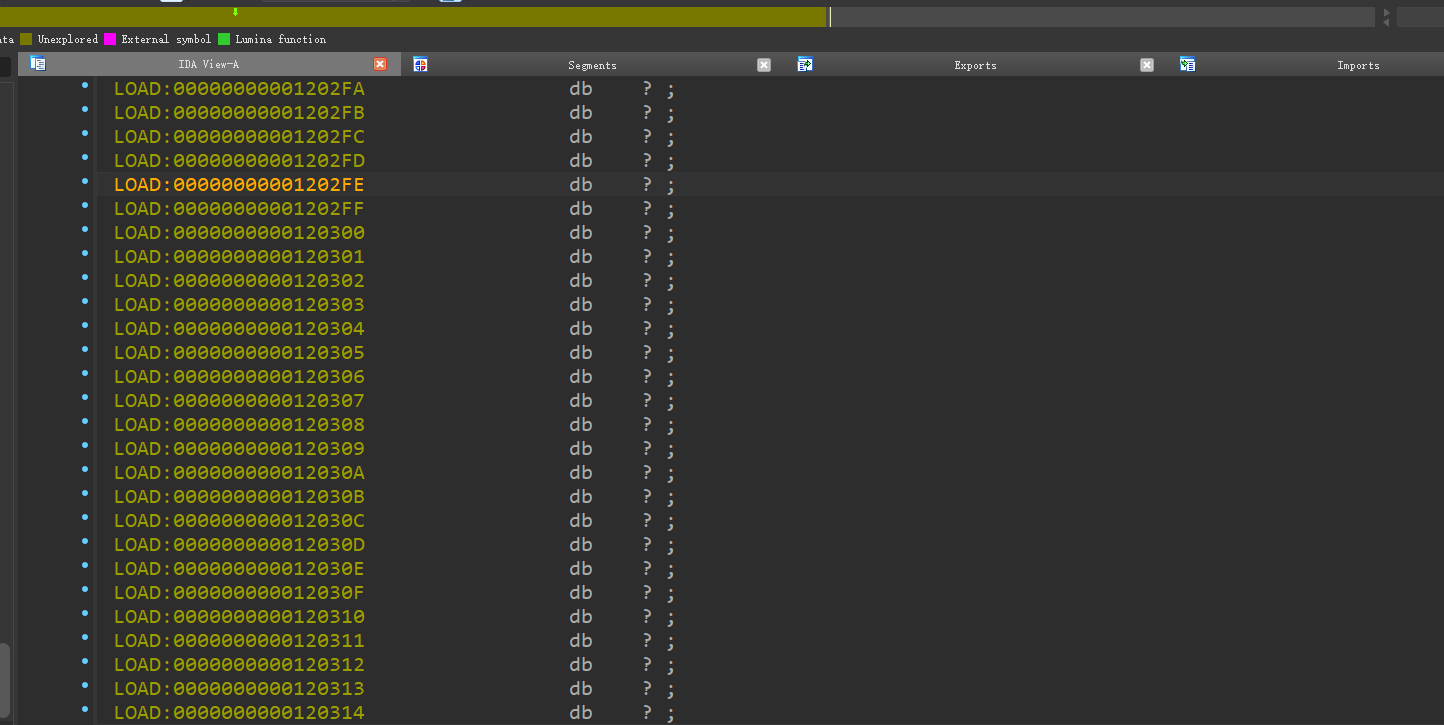
Native层分析 分析so文件,发现导入导出表被抹除得一干二净
如果没有导入导出表的话,elf文件应该是使用了自定义的动态链接器来进行链接的,所以,只要再elf文件被装载进内存之后将它dump下来,应该就能恢复符号表了
在Linux系统中,dlopen函数用于动态链接库加载函数,它存在于libdl.so库中
1 2 3 4 5 6 7 8 9 10 11 12 13 14 15 16 17 18 19 20 21 void * libHandle = dlopen("/data/data/pkg/libnative.so" , RTLD_NOW);if (!libHandle) {printf ("Error: %s\n" , dlerror());return ;typedef int (*NativeFunc) (int ) ;"native_add" );if (!func) {printf ("Error: %s\n" , dlerror());return ;int result = func(42 );
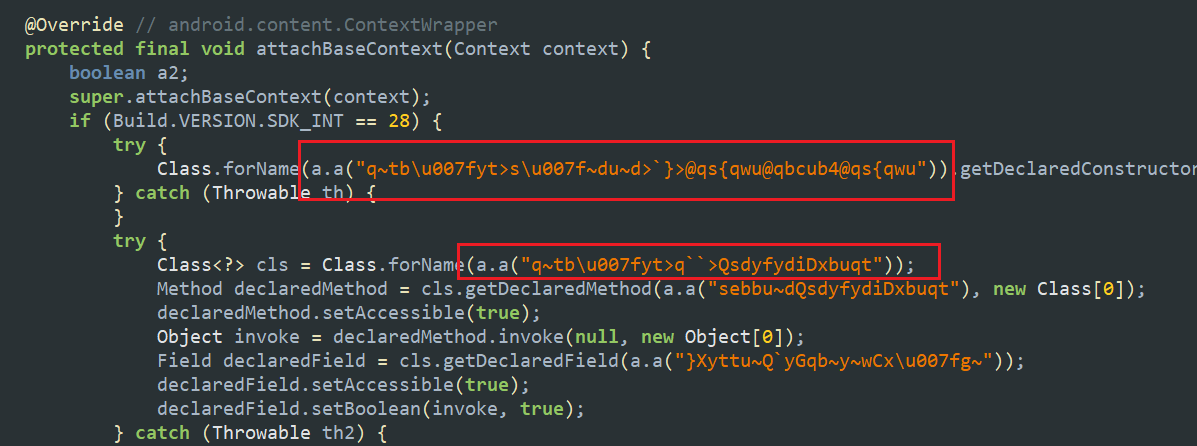
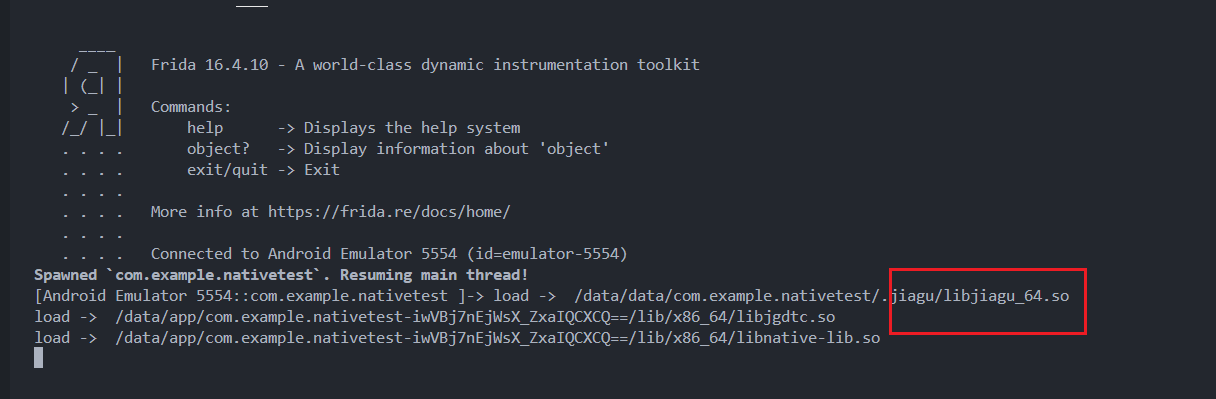
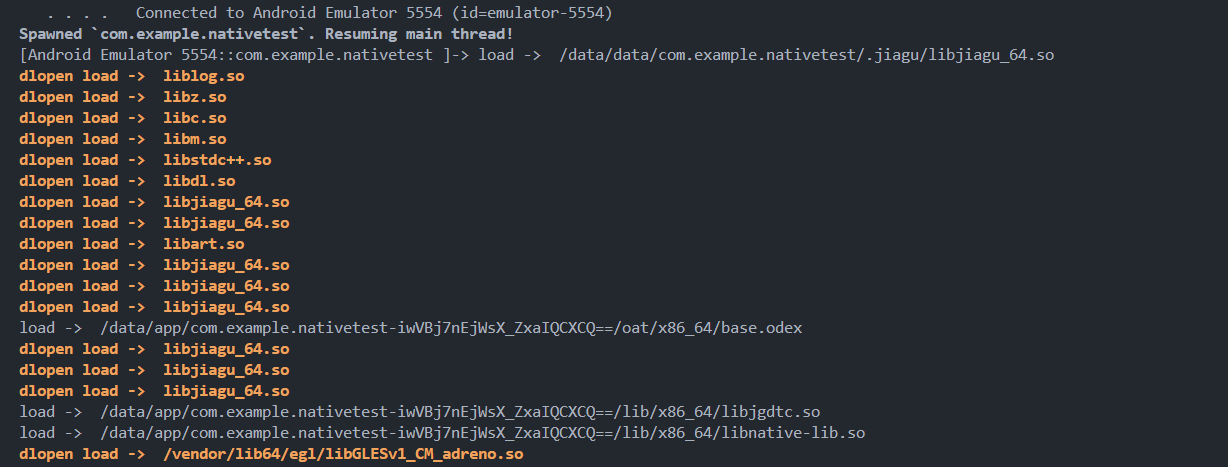
在安卓7.0之后,则需要hook的是android_dlopen_ext函数
frida hook一下看看它加载了哪些函数
android_dlopen_ext() 的格式为android_dlopen_ext("/data/data/pkg/libsecret.so", RTLD_NOW, NULL);,所以我们需要获取第一个参数的值来得到它链接了哪些so文件
1
2
3
4
5
6
7
8
9
10
11
12
13
14
15
16
17
18
19
20
21
22
23
function hook () {"libdl.so" , "android_dlopen_ext" ), {log ("load -> " , args[0 ].readCString());main () {
正如所料,它链接了这个so文件
接下来在它将该so文件装载到内存之后dump下来,就可以得到带有导入导出表的so文件了
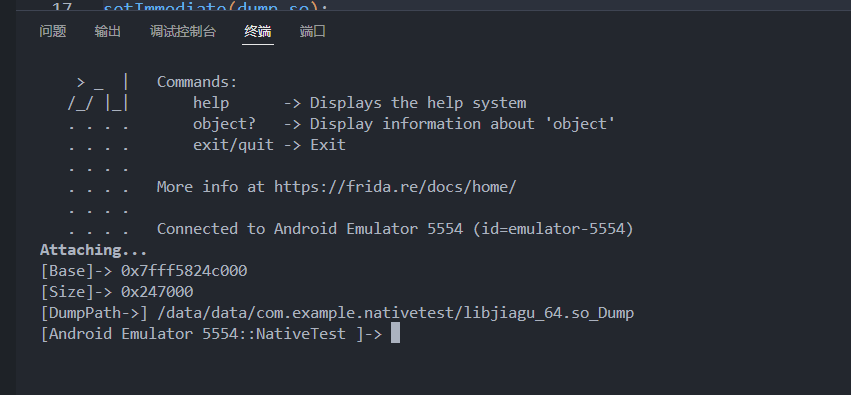
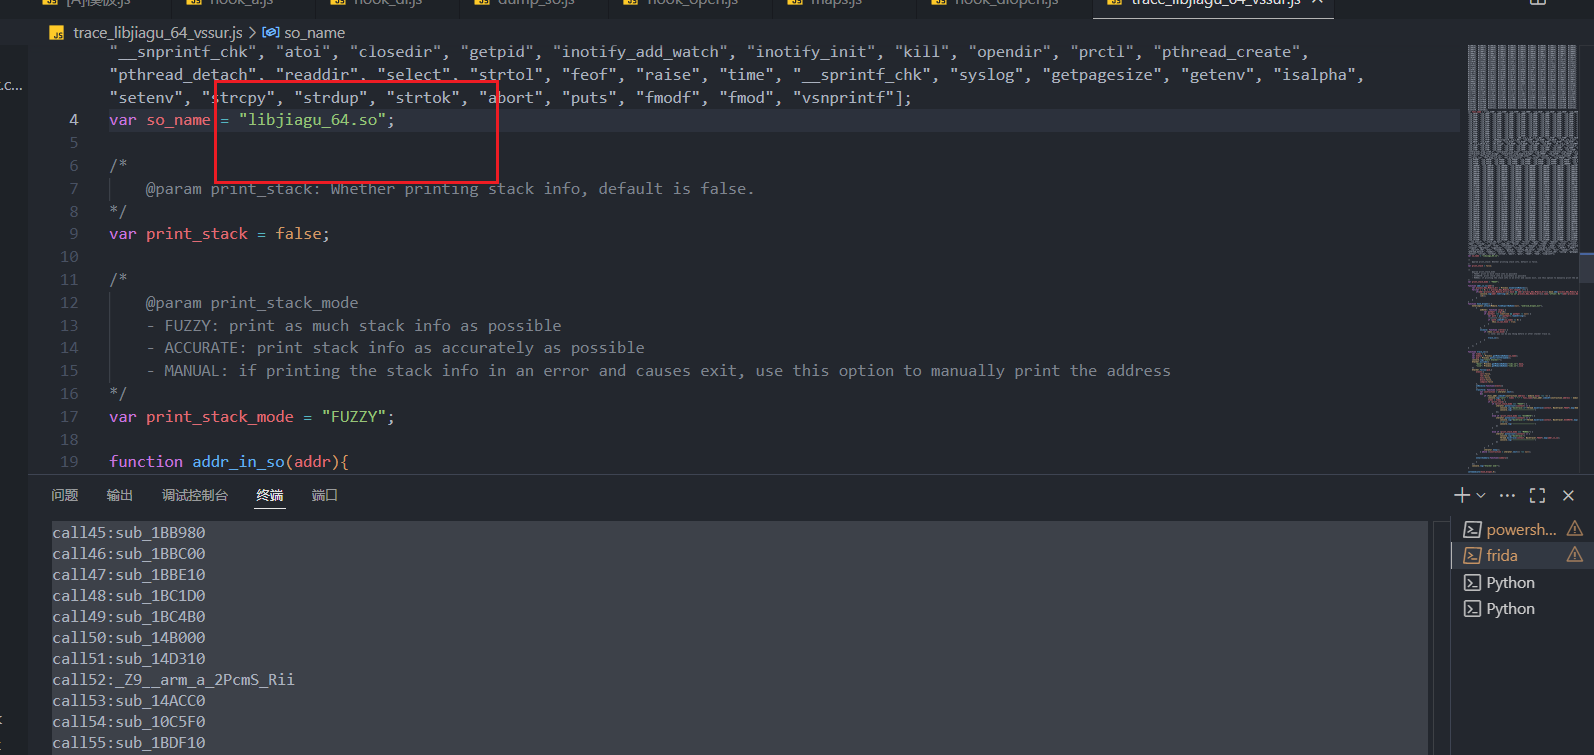
(dump脚本来自SWDD)
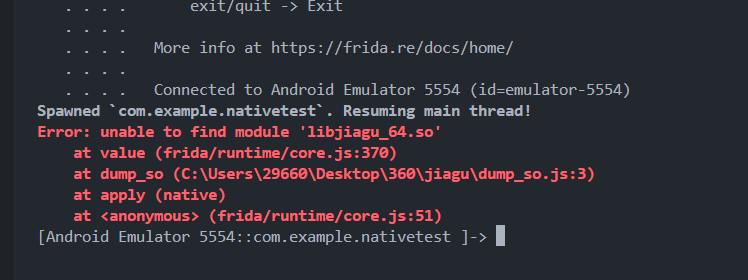
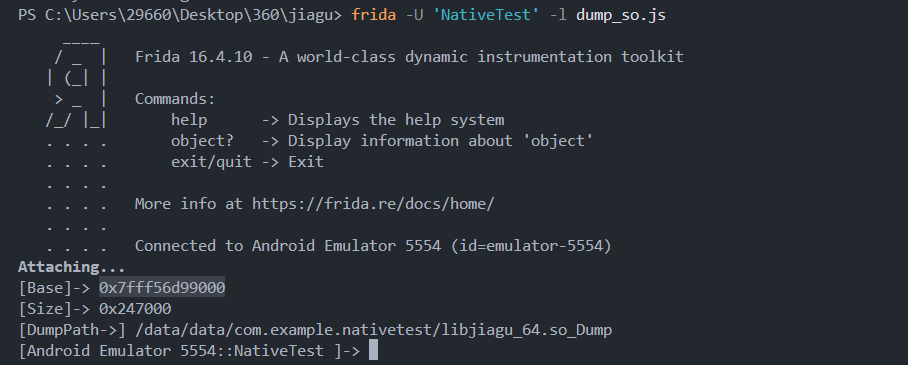
1
2
3
4
5
6
7
8
9
10
11
12
13
14
15
16
17
function dump_so (var soName = "libjiagu_64.so" ;var libSo = Process .getModuleByName (soName);var save_path = "/data/data/com.example.nativetest/" + libSo.name + "_Dump" ;console .log ("[Base]->" , libSo.base );console .log ("[Size]->" , ptr (libSo.size ));var handle = new File (save_path, "wb" );Memory .protect (ptr (libSo.base ), libSo.size , 'rwx' );var Buffer = libSo.base .readByteArray (libSo.size );write (Buffer );flush ();close ();console .log ("[DumpPath->]" , save_path);setImmediate (dump_so);
注意,要在app运行之后再把脚本附加上去,否则如果还没来得及链接就dump的话,frida会直接报错
所以这里使用命令
1 frida -U 'NativeTest' -l dump_so.js
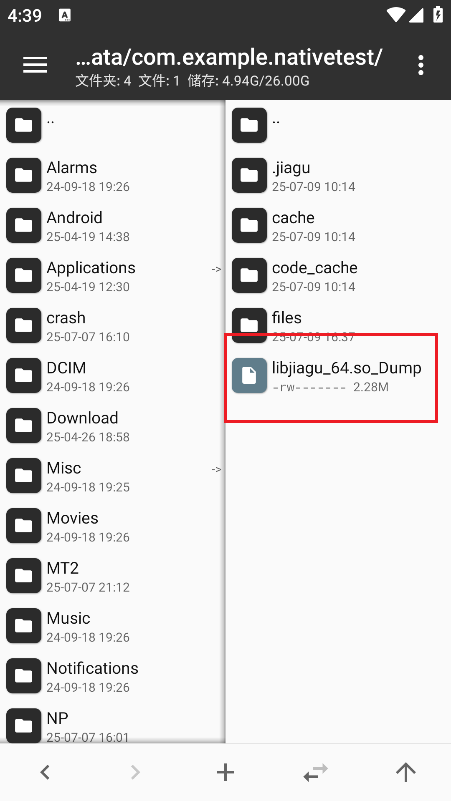
成功dump,并且得到了文件的基地址和大小
成功恢复
壳文件分析 这里有一个知识点
加固壳的典型行为模式 加固壳的核心任务是 保护原始代码 ,其常见流程包括:
解密资源 :
原始 APK/Dex/So 文件被加密,隐藏在 assets、lib/ 或自定义目录中。
运行时,壳代码需要先 读取这些加密文件 (通过 open + read)。
动态加载 :
解密后的文件(如 Dex、So)会通过 dlopen、mmap 或 DexClassLoader 加载到内存。
内存执行 :
解密后的代码在内存中执行,避免留下完整的磁盘文件。
关键点 :加固壳必须读取加密文件 → 必然调用 open 函数 → Hook open 可以捕获文件访问路径 。
思路就是 hook open函数来看看它有没有读取什么东西
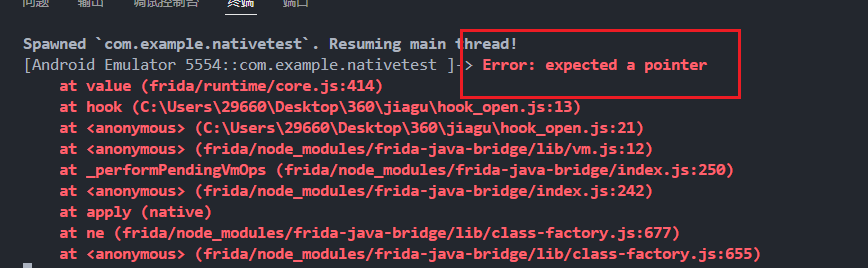
1
2
3
4
5
6
7
8
9
10
11
12
13
14
15
16
17
18
19
20
21
22
23
24
25
26
function hook (var openPtr = Module .findExportByName (null , "open" );const open = new NativeFunction (openPtr, 'int' , ['pointer' , 'int' ]);Interceptor .replace (openPtr, new NativeCallback (function (fileNamePtr, flag ) {var fileName = fileNamePtr.readCString ();console .log ("[open : ]" , fileName);return open (fileNamePtr, flag);'int' , ['pointer' , 'int' ]))function main (Java .perform (function (hook ();setImmediate (main);
注意这里一定要new一个NativeCallback
在 Frida 中,NativeCallback 的作用是 创建一个符合原生代码调用约定的 JavaScript 回调函数 ,用于替换或拦截原生函数(如 open)
原生代码(如 C 的 open 函数)有严格的 参数传递规则 (如寄存器/栈传参、类型转换),而 JavaScript 是弱类型语言,无法直接匹配
不然的话会出现如下报错
fileNamePtr 可能未被正确识别为 pointer 类型
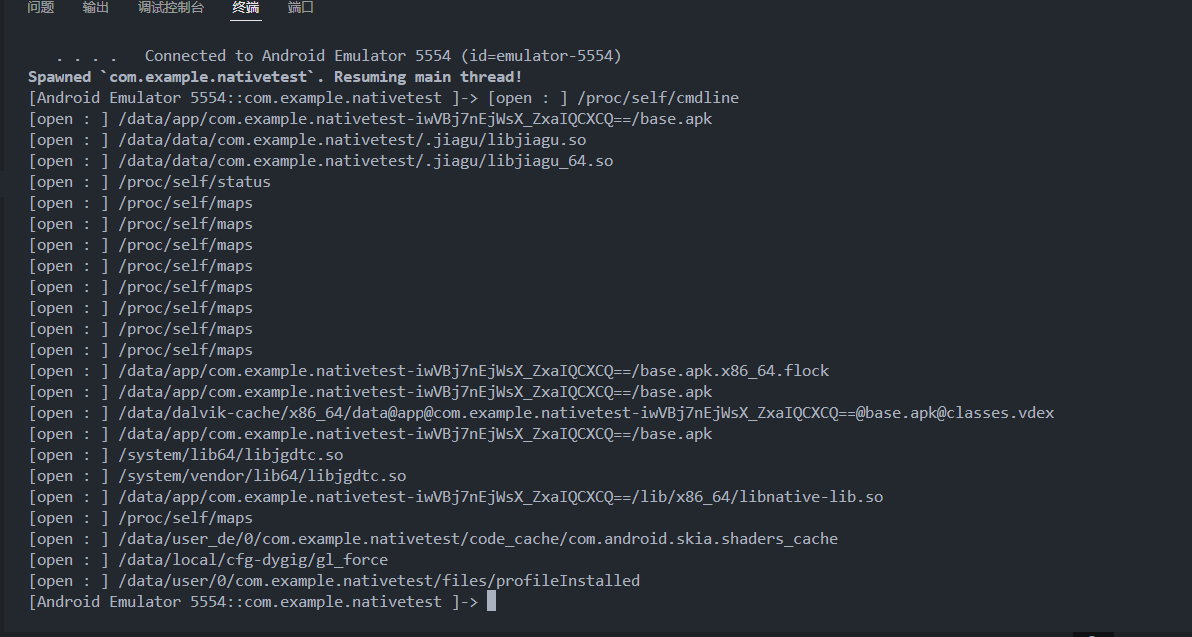
可以看到打开了如下文件
发现个很可疑的点,它频繁访问了 /proc/self/maps
/proc/self/maps 的作用
这里反复读取maps猜测是为了混淆视听,当加载dex时,maps上的内存映射会发生变化,留下记录,比如 /data/app/xxx/base.dex,这时候壳文件就通过反复读取maps来隐藏打开dex的操作,掩盖真正的 Dex 加载时机
此时,如果我们自定义一个fakeMaps,将壳文件对maps的操作重定向到我们的fakeMaps上,就可以很方便地观察壳文件加载dex的操作了,同时也能避免壳的反检测机制(如果有的话)
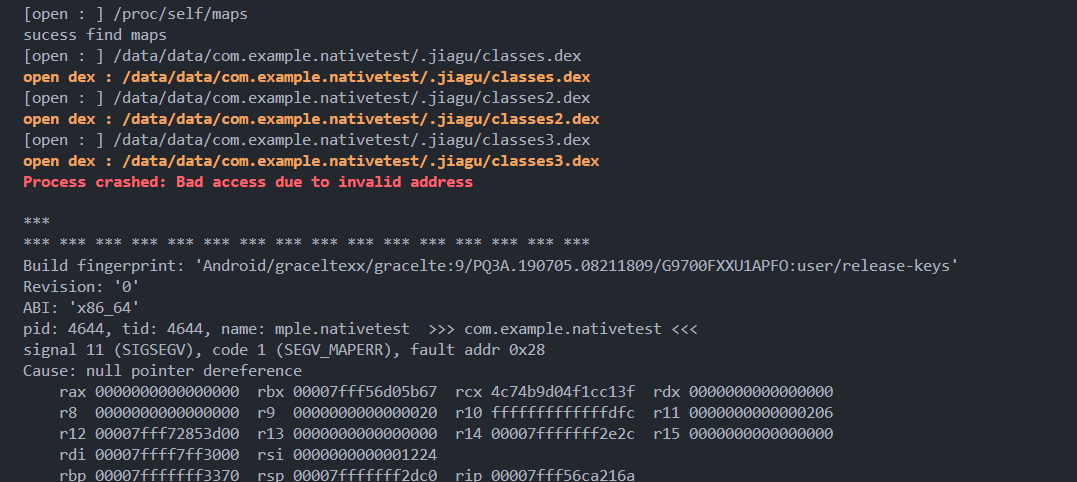
1
2
3
4
5
6
7
8
9
10
11
12
13
14
15
16
17
18
19
20
21
22
23
24
25
26
27
28
29
30
31
32
33
34
35
36
37
38
39
40
41
42
43
44
45
function hook (var openPtr = Module .findExportByName (null , "open" );const open = new NativeFunction (openPtr, 'int' , ['pointer' , 'int' ]);var fakeMaps = "/data/data/com.example.nativetest/maps" Interceptor .replace (openPtr, new NativeCallback (function (fileNamePtr, flag ) {var fileName = fileNamePtr.readCString ();console .log ("[open : ]" , fileName);var FD = open (fileNamePtr, flag); if (fileName.indexOf ("maps" ) >= 0 ) { console .log ("sucess find maps" );var fakeMapsAddr = Memory .allocUtf8String (fakeMaps);return open (fakeMapsAddr, flag); if (fileName.indexOf ("dex" != -1 )) {console .warn ("open dex :" , fileName);return FD ; 'int' , ['pointer' , 'int' ]))function main (Java .perform (function (hook ();setImmediate (main);
可以发现确实是通过open去打开了dex文件,而且通过反复读取了maps来隐藏操作,验证了我们之前的猜想
使用来查看dex的内存地址
1 console .warn ('dex called from:\n' + Thread .backtrace (this .context , Backtracer .FUZZY ).map (DebugSymbol .fromAddress ).join ('\n' ) + '\n' );
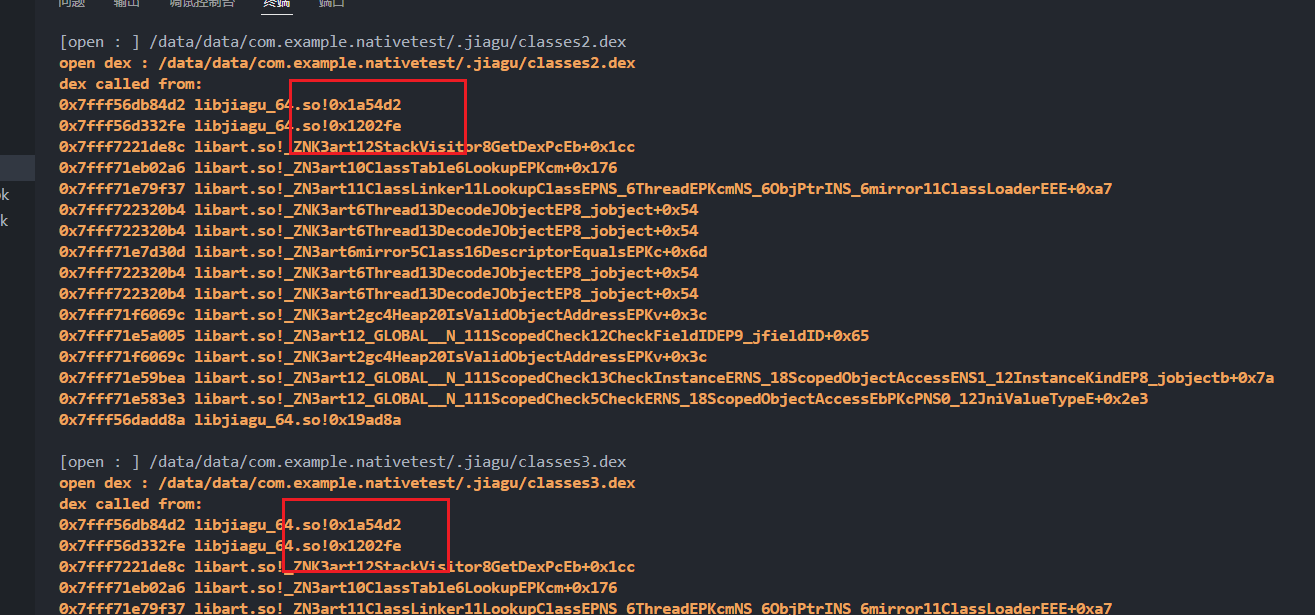
1
2
3
4
5
6
7
8
9
10
11
12
13
14
15
16
17
18
19
20
21
22
23
24
25
26
27
28
29
30
31
32
33
34
35
36
37
38
39
40
41
42
43
function hook (var openPtr = Module .findExportByName (null , "open" );const open = new NativeFunction (openPtr, 'int' , ['pointer' , 'int' ]);var fakeMaps = "/data/data/com.example.nativetest/maps" ;Interceptor .replace (openPtr, new NativeCallback (function (fileNamePtr, flag ) {var fileName = fileNamePtr.readCString ();console .log ("[open : ]" , fileName);var FD = open (fileNamePtr, flag); if (fileName.indexOf ("maps" ) >= 0 ) { console .log ("sucess find maps" );var fakeMapsAddr = Memory .allocUtf8String (fakeMaps);return open (fakeMapsAddr, flag); if (fileName.indexOf ("dex" ) != -1 ) {console .warn ("open dex :" , fileName);console .warn ('dex called from:\n' + Thread .backtrace (this .context , Backtracer .FUZZY ).map (DebugSymbol .fromAddress ).join ('\n' ) + '\n' );return FD ; 'int' , ['pointer' , 'int' ]))function main (Java .perform (function (hook ();setImmediate (main);
可以发现打开dex的地址基本一模一样,在IDA中查看这个地址
嘶,啥也没有,这不对吧
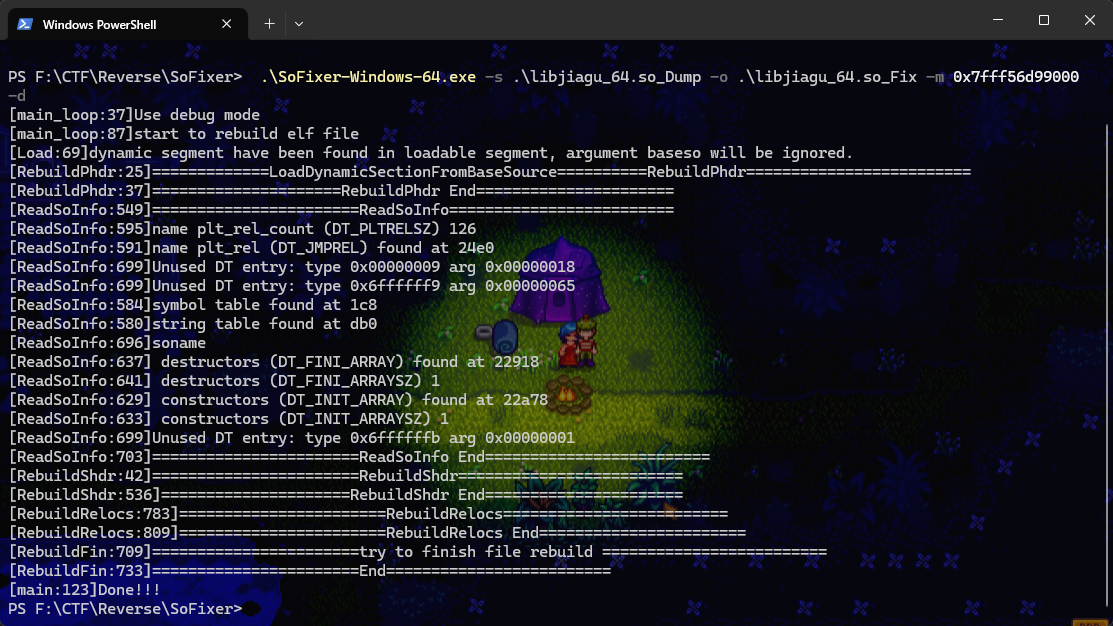
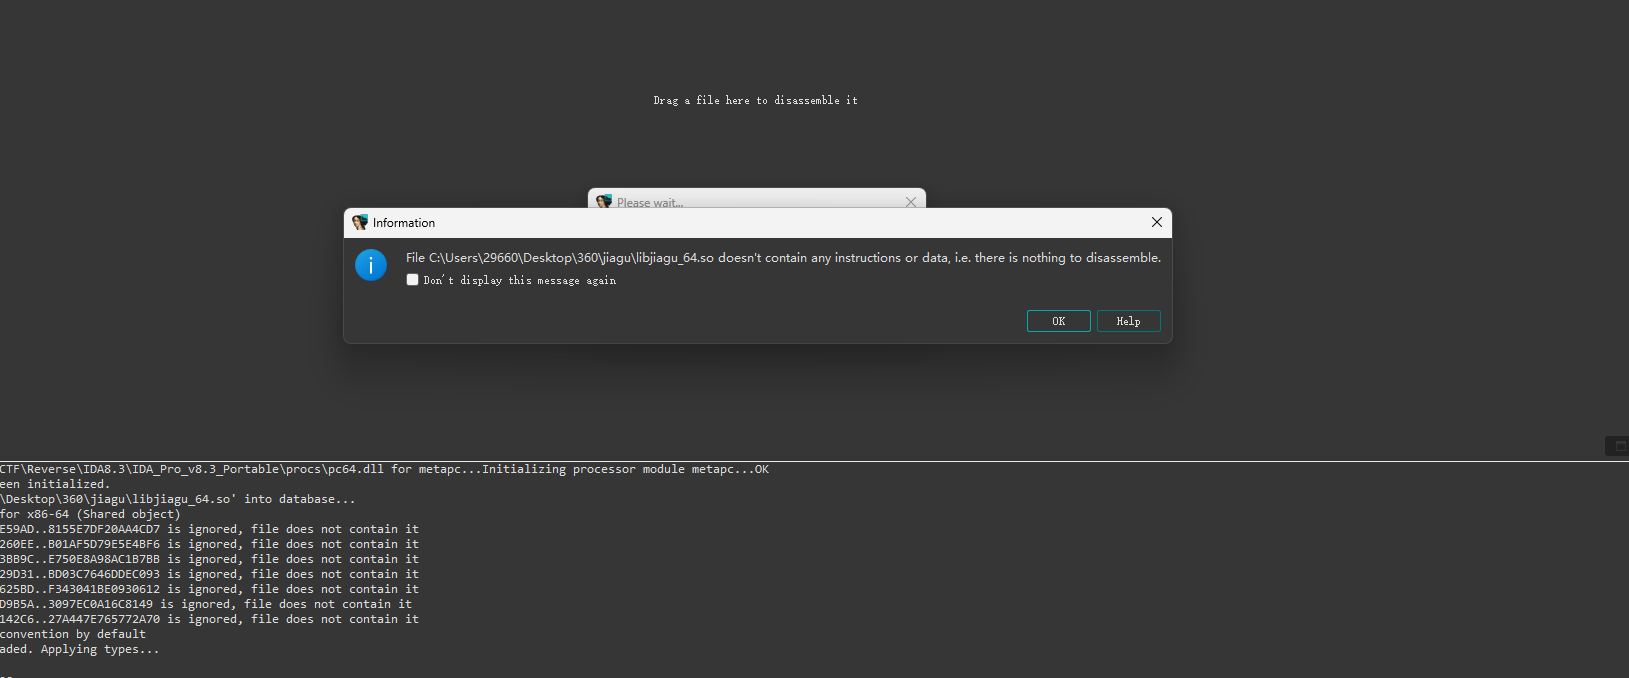
查阅多方资料,发现我漏了一步,在先前dump so文件的时候,so文件可能会有损坏,所以先需要修复一下so文件
使用soFixer
soFixer 0x0x7fff56d99000是之前dump so文件的时候输出的基地址
1 .\SoFixer -Windows -64. exe -s .\libjiagu_64.so_Dump -o .\libjiagu_64.so_Fix -m 0x7fff56d99000 -d
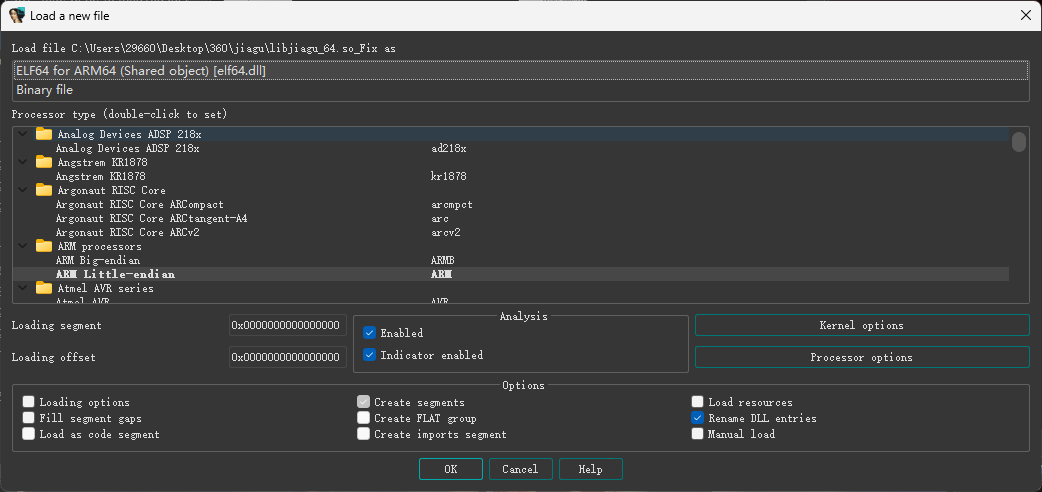
使用sofix之后IDA将其识别成了ARM架构,但是我原本的文件是x86_64架构,这里要重新选择一下
这下就没问题了
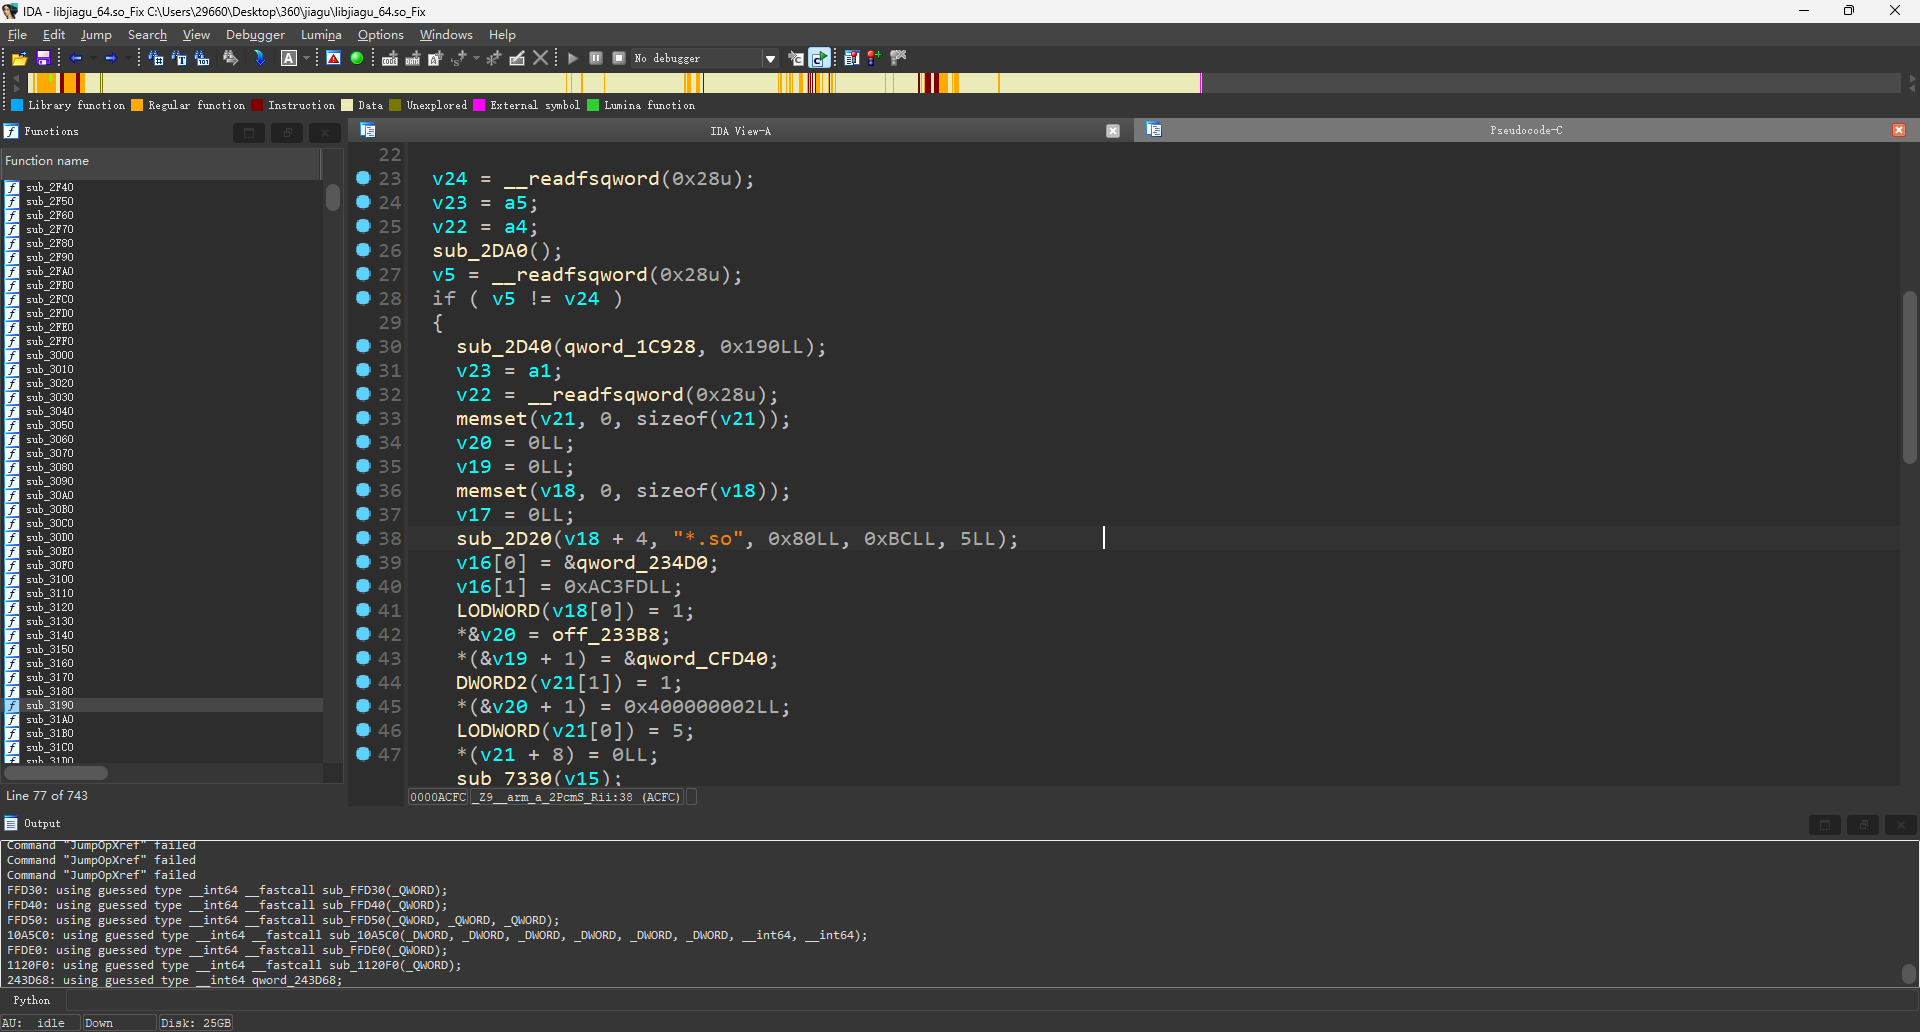
但是这段数据全是未定义的,这个时候就手足无措了
一通乱翻,发现了这样一个函数
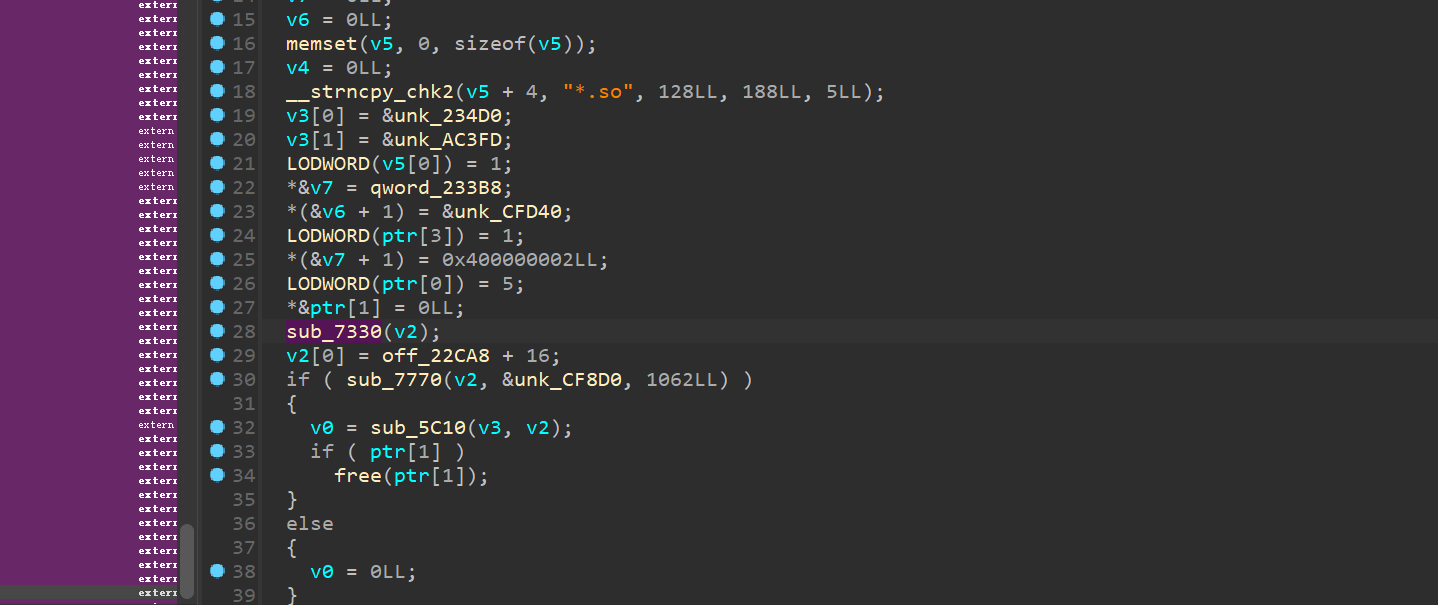
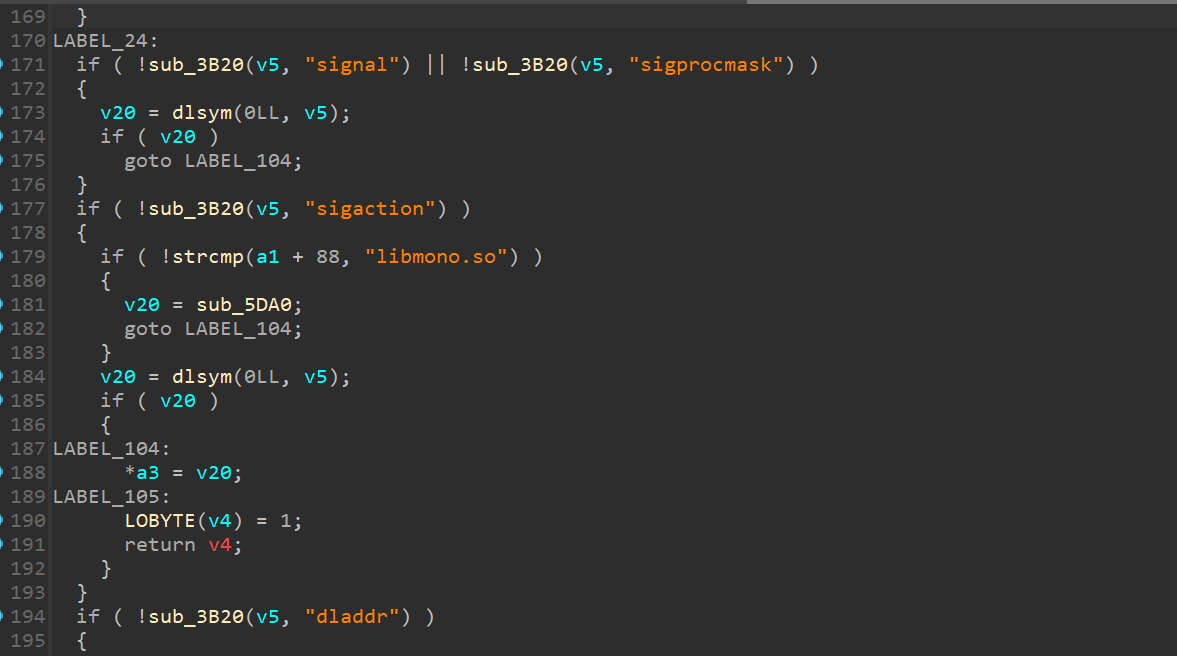
1
2
3
4
5
6
7
8
9
10
11
12
13
14
15
16
17
18
19
20
21
22
23
24
25
26
27
28
29
30
31
32
33
34
35
36
37
38
39
40
41
42
43
44
45
46
47
48
49
50
51
52
53
54
55
56
57
58
59
60
61
62
63
64
65
66
67
68
69
70
71
72
73
74
75
76
77
78
79
80
81
82
83
84
85
86
87
88
89
90
91
92
93
94
95
96
char __fastcall __arm_a_2(char *a1, unsigned __int64 a2, char *a3, int *a4, unsigned int a5)unsigned __int64 v5; char v12[8 ]; unsigned __int64 v13; 7 ]; 2 ]; 8 ]; 2 ]; int *v22; unsigned __int64 v23; unsigned __int64 v24; 0x28 u);0x28 u);if ( v5 != v24 )0x190 LL);0x28 u);memset (v21, 0 , sizeof (v21));0LL ;0LL ;memset (v18, 0 , sizeof (v18));0LL ;4 , "*.so" , 0x80 LL, 0xBC LL, 5LL );0 ] = &qword_234D0;1 ] = 0xAC3FD LL;0 ]) = 1 ;1 ) = &qword_CFD40;1 ]) = 1 ;1 ) = 0x400000002 LL;0 ]) = 5 ;8 ) = 0LL ;0 ] = qword_22CA8 + 16 ;if ( sub_7770(v15, &qword_CF8D0, 1062LL ) )if ( *(&v21[0 ] + 1 ) )else 0LL ;if ( __readfsqword(0x28 u) == v22 )else 0x28 u);if ( v15 )strcpy (v12, "makekey" );if ( v9 )0xFFFFFFFFFFFFF000 LL);"pthread_create" + 3 );0xFFFFFFFFFFFFF000 LL, 4096LL , 3LL );0x28 u);if ( v5 != v13 )1 ;return v5;
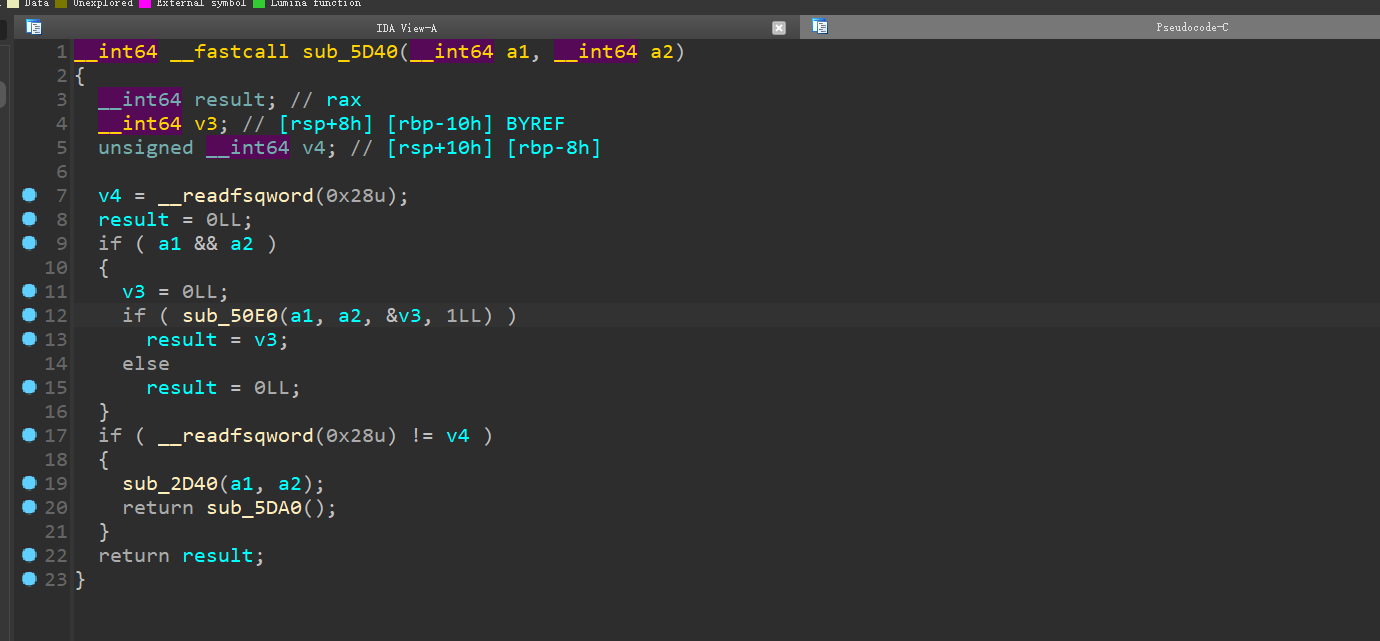
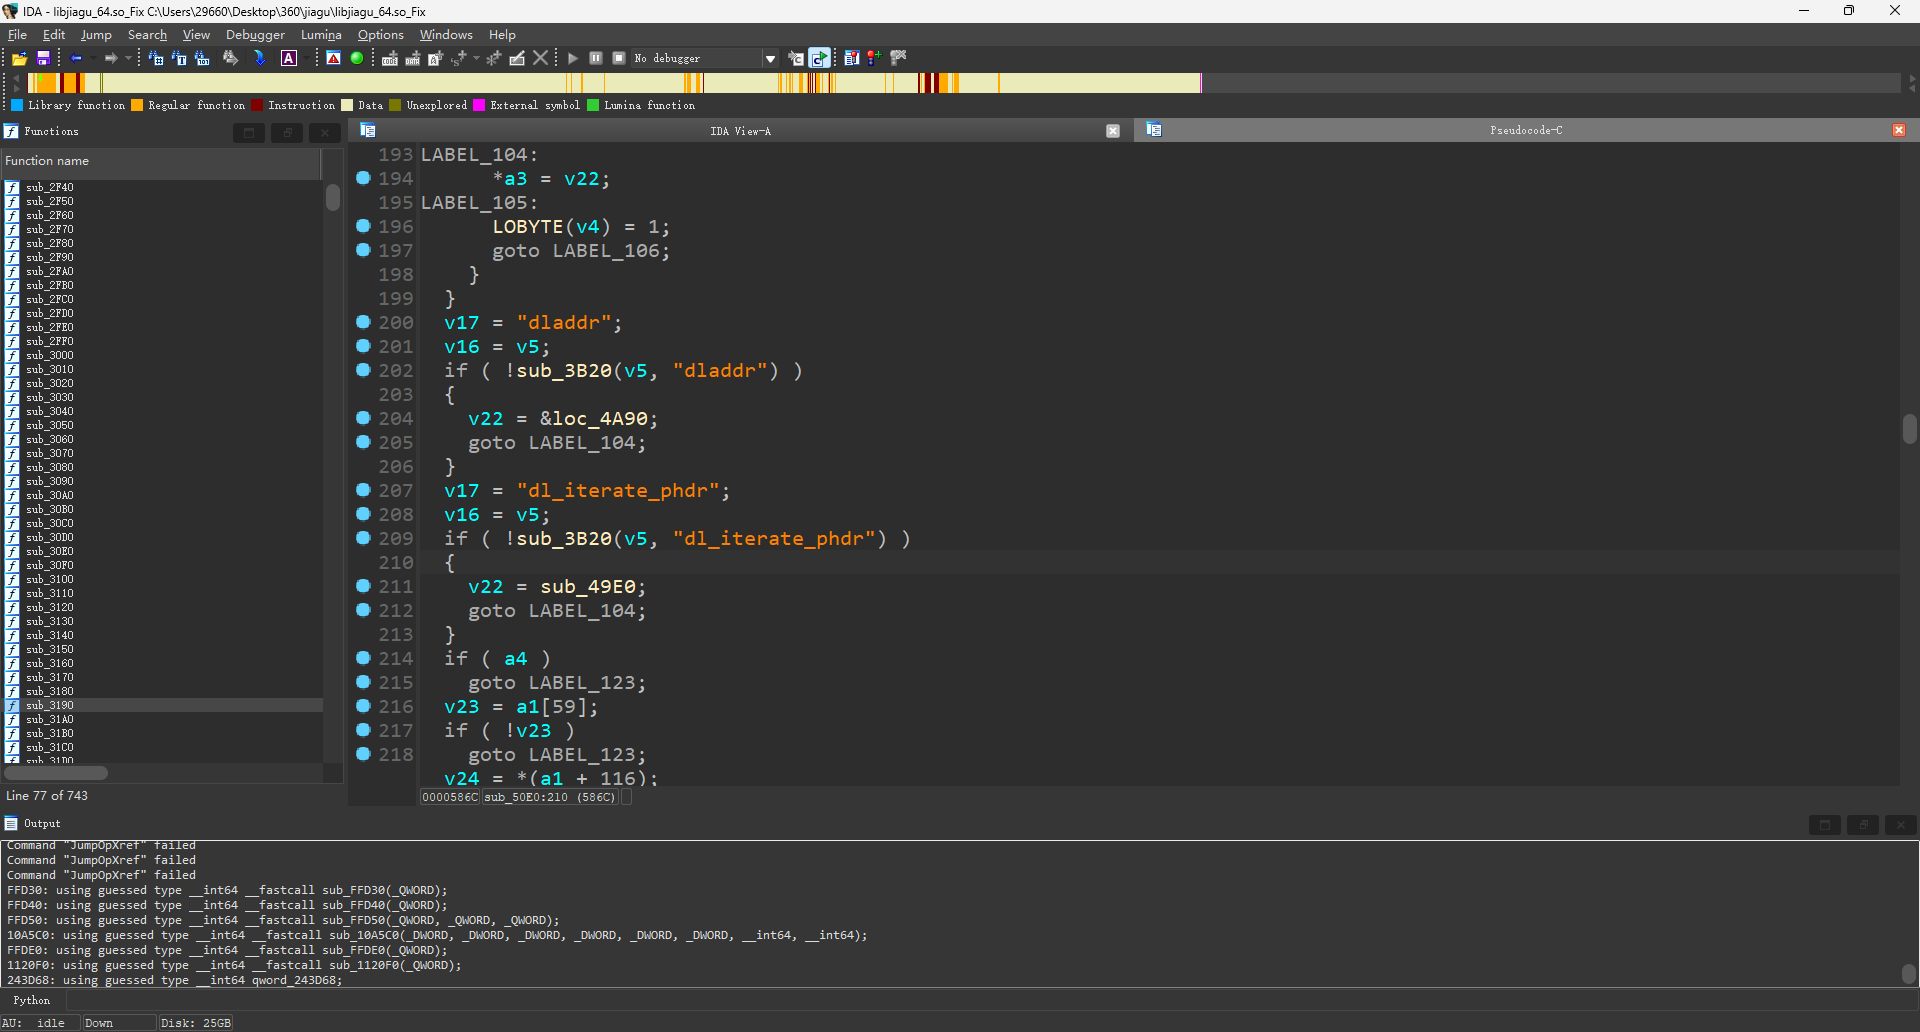
查看sub_50E0
发现了一些用于加载动态链接相关的字符串,结合之前创建线程,这个时候就猜测,应该已经在加载另外的so了
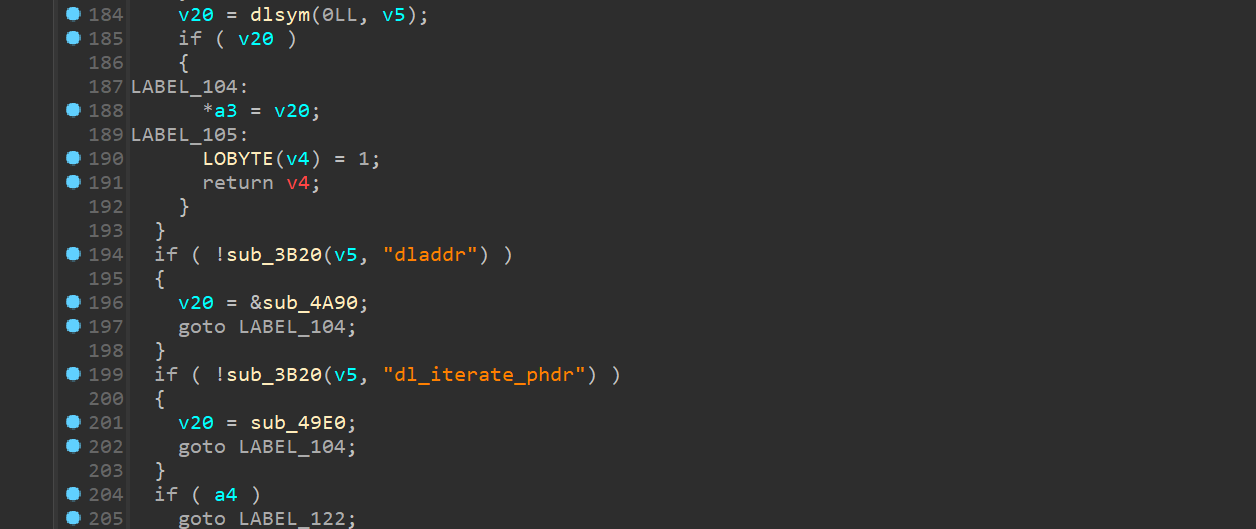
安卓系统中,完成linker之后,dlopen去加载这个so,我们之前hook的是android_dlopen_ext,这里再去hook一下dlopen看看它加载了哪些so文件
1
2
3
4
5
6
7
8
9
10
11
12
13
14
15
16
17
18
19
20
21
22
23
24
25
26
27
28
29
30
31
32
33
34
35
36
37
38
39
40
41
function hook (Interceptor .attach (Module .findExportByName ("libdl.so" , "android_dlopen_ext" ), {onEnter : function (args ) {console .log ("load -> " , args[0 ].readCString ());onLeave : function (retval ) {function hook2 (Interceptor .attach (Module .findExportByName ("libdl.so" , "dlopen" ), {onEnter : function (args ) {console .warn ("dlopen load -> " , args[0 ].readCString ());onLeave : function (retval ) {function main (Java .perform (function (hook ();hook2 ();setImmediate (main);
看到这里,基本上可以说明就是自定义linker加固so文件了
查阅资料发现,自定义linker加固so的流程是,自定义文件格式加密so,然后壳代码实现将加密的so文件加载,链接重定位并修正soinfo(三部曲)
简单来说就是将elf文件的.text等数据段进行加密,然后在link的时候补充soinfo
soinfo 是 Android linker 内部维护的数据结构,用于 管理已加载的共享库(.so) 。每个被 dlopen 或程序依赖的 .so 都会有一个对应的 soinfo 结构,存储:
库的基地址(加载地址) 符号表、重定位表、依赖关系 动态段( .dynamic )解析后的信息 命名空间(用于库隔离) soinfo 的生命周期
加载阶段 :dlopen → linker 解析 ELF → 创建 soinfo 并填充信息。链接阶段 :linker 根据 .dynamic 段解析依赖、符号、重定位。运行时 :dlsym 通过 soinfo 查找符号地址。卸载阶段 :dlclose 释放 soinfo。
由于之前的so在执行的时候link了另外的so,所以将其放入010editor里查找elf头
找到了elf头,并且可以看到program header已经被加密了
写一个脚本,将0xd0000之后的内容提取出来
提取出来的so文件ida是打不开的,因为program header已经被加密了
此时就需要找到这个so是在哪里被解密的
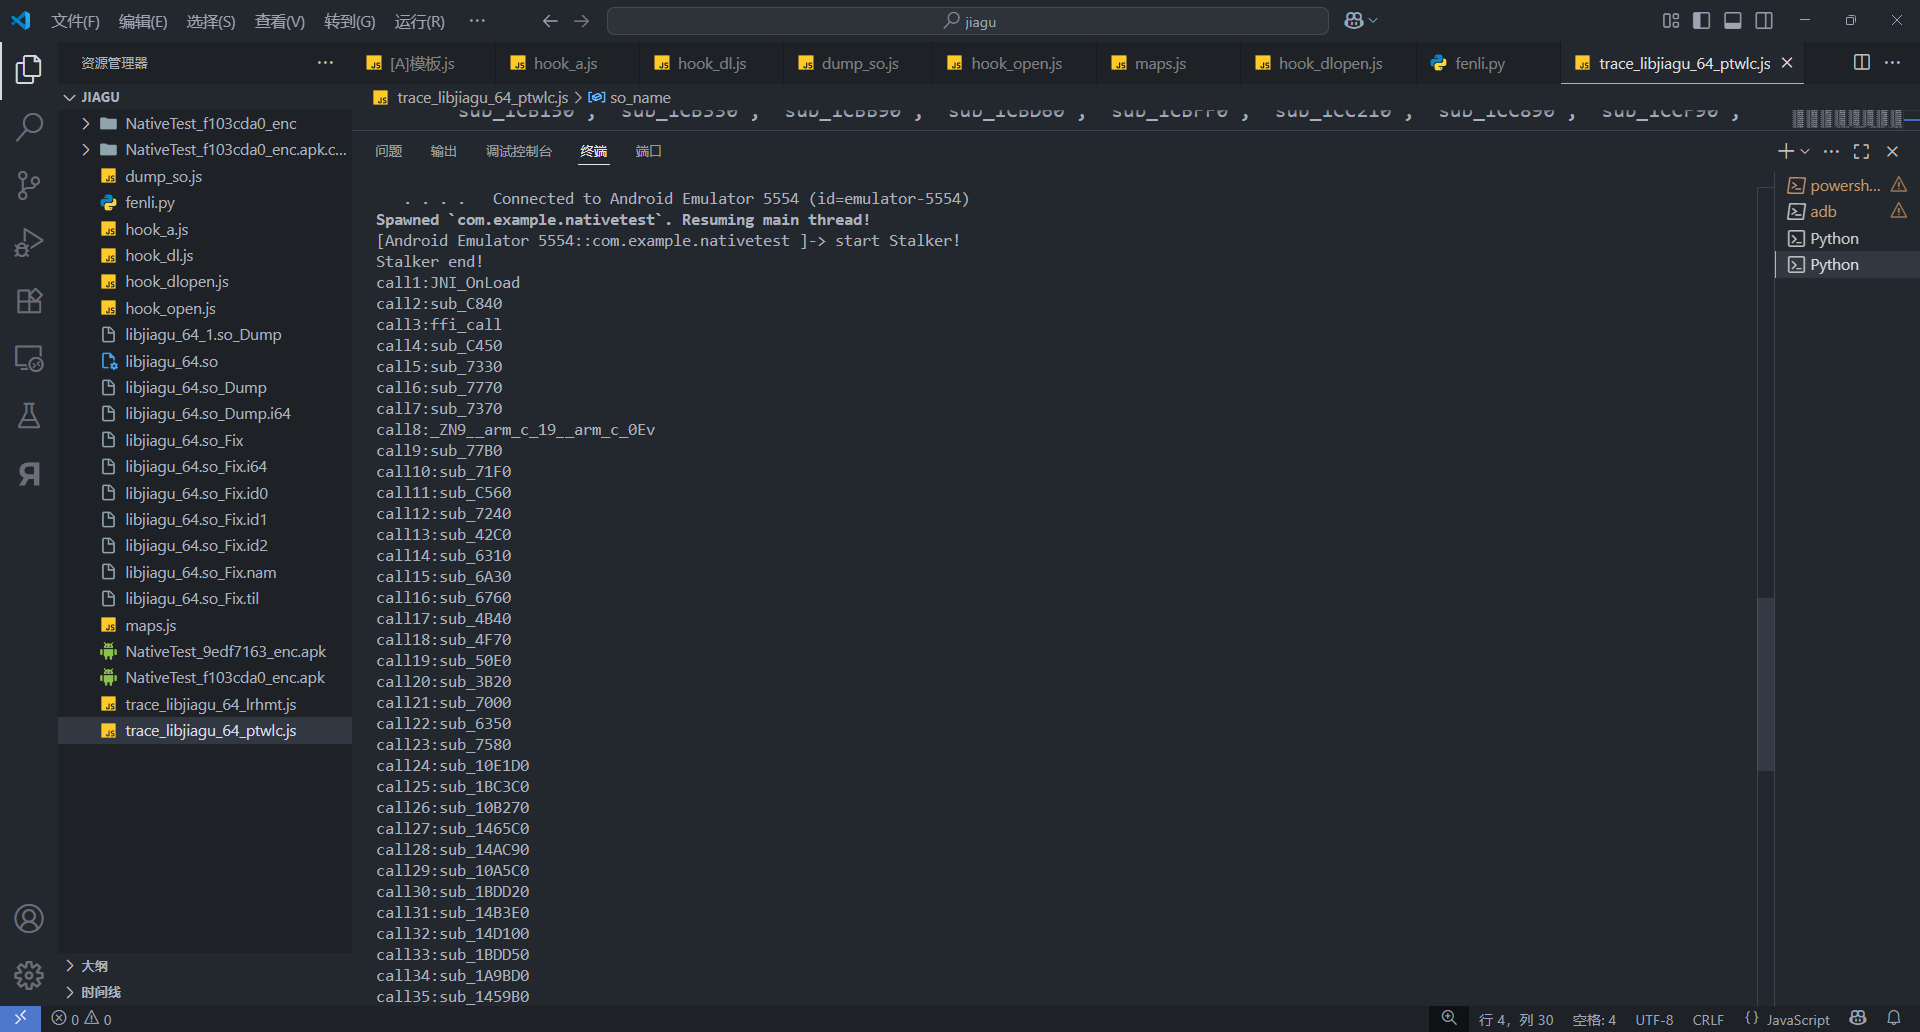
用oacia大佬的项目来分析一下程序执行流
https://github.com/oacia/stalker_trace_so
1 2 3 4 5 6 7 8 9 10 11 12 13 14 15 16 17 18 19 20 21 22 23 24 25 26 27 28 29 30 31 32 33 34 35 36 37 38 39 40 41 42 43 44 45 46 47 48 49 50 51 52 53 54 55 56 57 58 59 60 [Android Emulator 5554 ::com.example .nativetest ]-> start Stalker !Stalker end!call1 :JNI_OnLoadcall2 :sub_C840call3 :ffi_callcall4 :sub_C450call5 :sub_7330call6 :sub_7770call7 :sub_7370call8 :_ZN9__arm_c_19__arm_c_0Evcall9 :sub_77B0call10 :sub_71F0call11 :sub_C560call12 :sub_7240call13 :sub_42C0call14 :sub_6310call15 :sub_6A30call16 :sub_6760call17 :sub_4B40call18 :sub_4F70call19 :sub_50E0call20 :sub_3B20call21 :sub_7000call22 :sub_6350call23 :sub_7580call24 :sub_10E1D0call25 :sub_1BC3C0call26 :sub_10B270call27 :sub_1465C0call28 :sub_14AC90call29 :sub_10A5C0call30 :sub_1BDD20call31 :sub_14B3E0call32 :sub_14D100call33 :sub_1BDD50call34 :sub_1A9BD0call35 :sub_1459B0call36 :sub_1BD700call37 :sub_1BD790call38 :sub_10ED90call39 :sub_1120F0call40 :sub_10CC10call41 :sub_106F90call42 :sub_1BB530call43 :sub_1BB620call44 :sub_1BC4E0call45 :sub_1BB980call46 :sub_1BBC00call47 :sub_1BBE10call48 :sub_1BC1D0call49 :sub_1BC4B0call55 :sub_1BDF10call56 :sub_116720call57 :sub_1BDD00call58 :sub_1AD9E0call59 :sub_1ADB60call60 :sub_1C49A0call61 :sub_1CAD30call62 :sub_1C8EC0call63 :sub_16FA70
再看一下fix之后的文件的控制流
1 2 3 4 5 6 7 8 9 10 11 12 13 14 15 16 17 18 19 20 21 22 23 24 25 26 27 28 29 30 31 32 33 34 35 36 37 38 39 40 41 42 43 44 45 46 47 48 49 50 51 52 53 54 55 56 57 58 59 60 61 62 63 64 [Android Emulator 5554 ::com.example .nativetest ]-> start Stalker !call1 :JNI_OnLoadcall2 :sub_C840call3 :ffi_callcall4 :sub_C450call5 :sub_7330call6 :sub_7770call7 :sub_7370call8 :_ZN9__arm_c_19__arm_c_0Evcall9 :sub_77B0call10 :sub_71F0call11 :sub_C560call12 :sub_7240call13 :sub_42C0call14 :sub_6310call15 :sub_6A30call16 :sub_6760call17 :sub_4B40call18 :sub_4F70call19 :sub_50E0call20 :sub_3B20call21 :sub_7000call22 :sub_6350call23 :sub_7580call24 :sub_10E1D0call25 :sub_1BC3C0call26 :sub_10B270call27 :sub_1465C0call28 :sub_14AC90call29 :sub_10A5C0call30 :sub_1BDD20call31 :sub_14B3E0call32 :sub_14D100call33 :sub_1BDD50call34 :sub_1A9BD0call35 :sub_1459B0call36 :sub_1BD700call37 :sub_1BD790call38 :sub_10ED90call39 :sub_1120F0call40 :sub_10CC10call41 :sub_106F90call42 :sub_1BB530call43 :sub_1BB620call44 :sub_1BC4E0call45 :sub_1BB980call46 :sub_1BBC00call47 :sub_1BBE10call48 :sub_1BC1D0call49 :sub_1BC4B0call50 :sub_14B000call51 :sub_14D310call52 :_Z9__arm_a_2PcmS_Riicall53 :sub_14ACC0call54 :sub_10C5F0call55 :sub_1BDF10call56 :sub_116720call57 :sub_1BDD00call58 :sub_1AD9E0call59 :sub_1ADB60call60 :sub_1C49A0call61 :sub_1CAD30call62 :sub_1C8EC0call63 :sub_16FA70
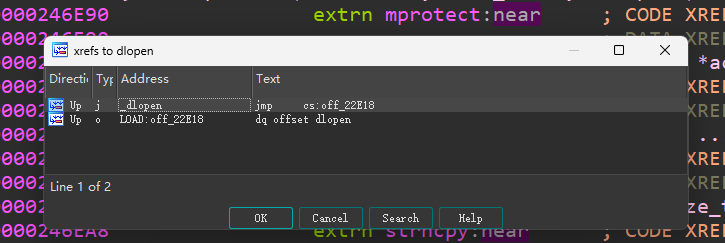
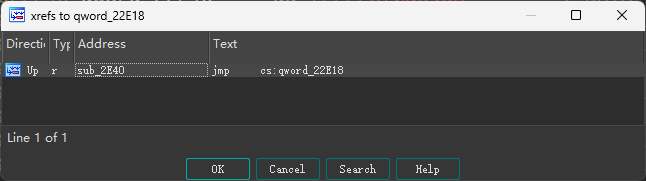
知道了控制流之后,虽然是自定义linker加固so,但是最后肯定还是需要dlopen去加载so的,在IDA里交叉引用一下dlopen,看看在哪里被调用了
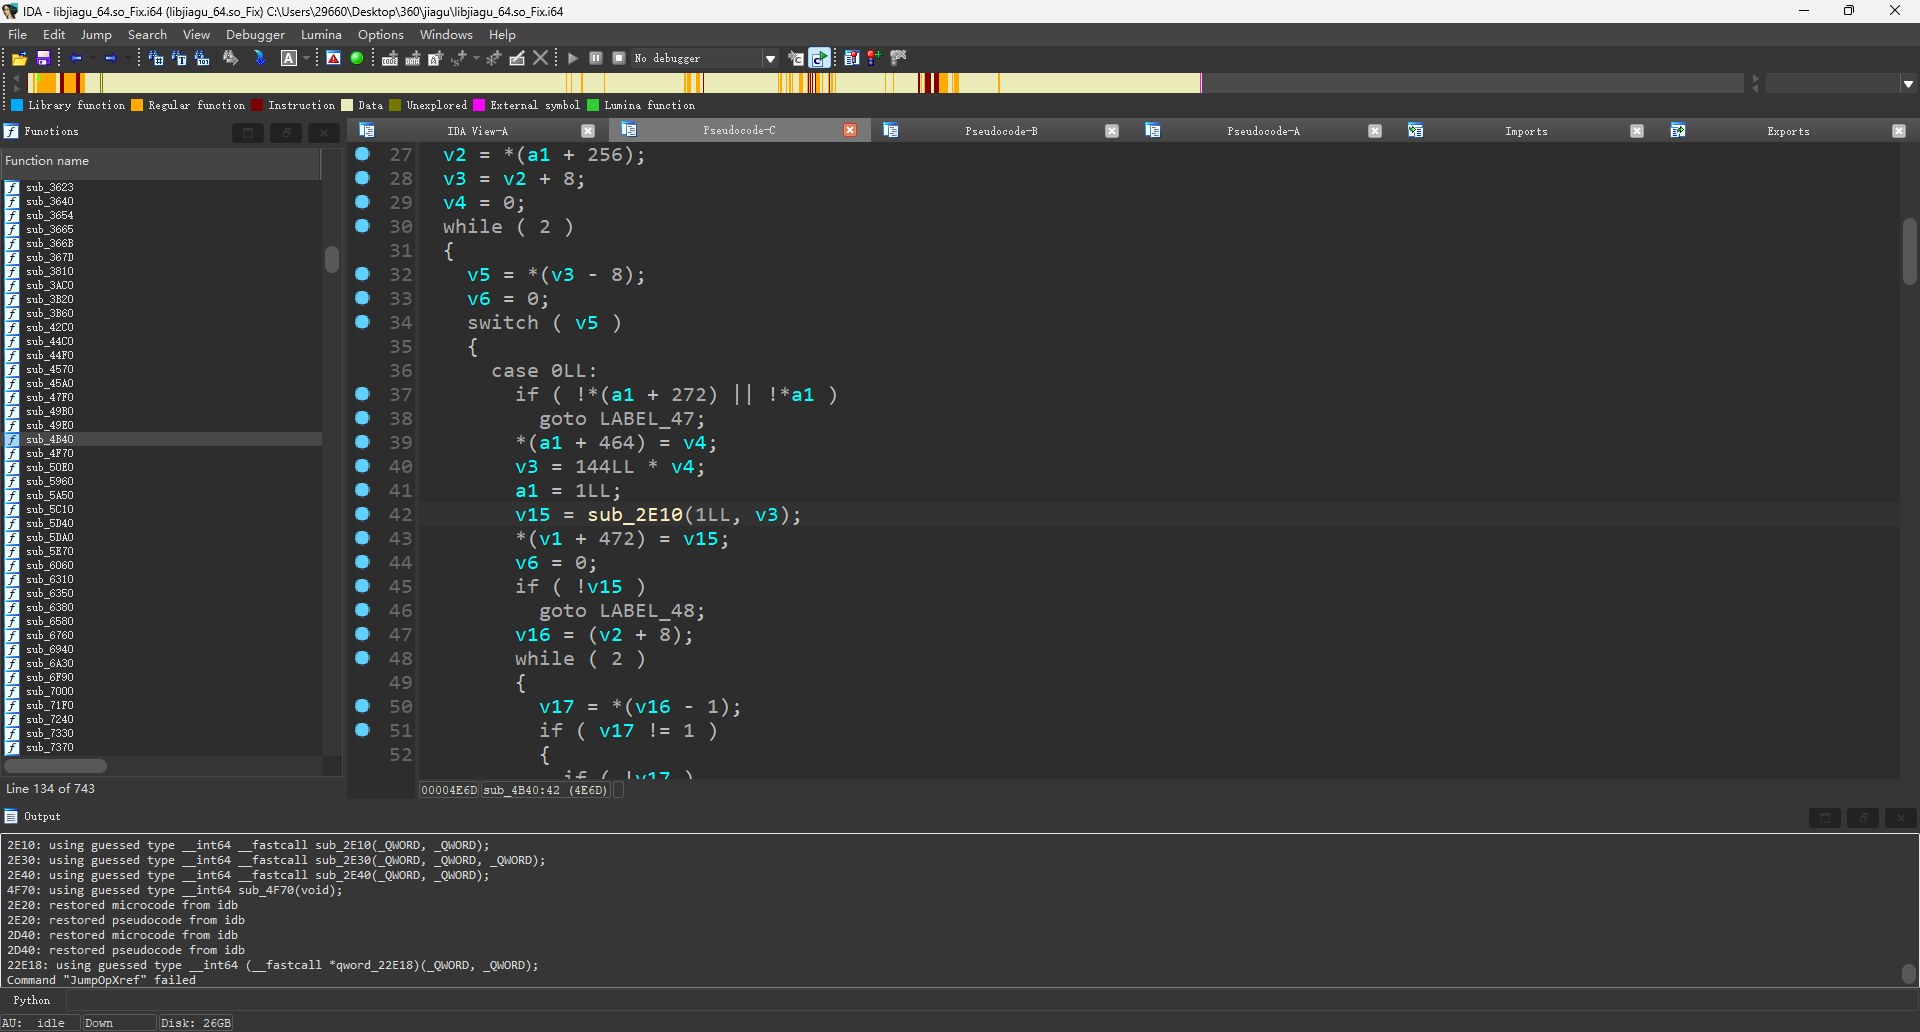
只有一处调用,全是switch case结构
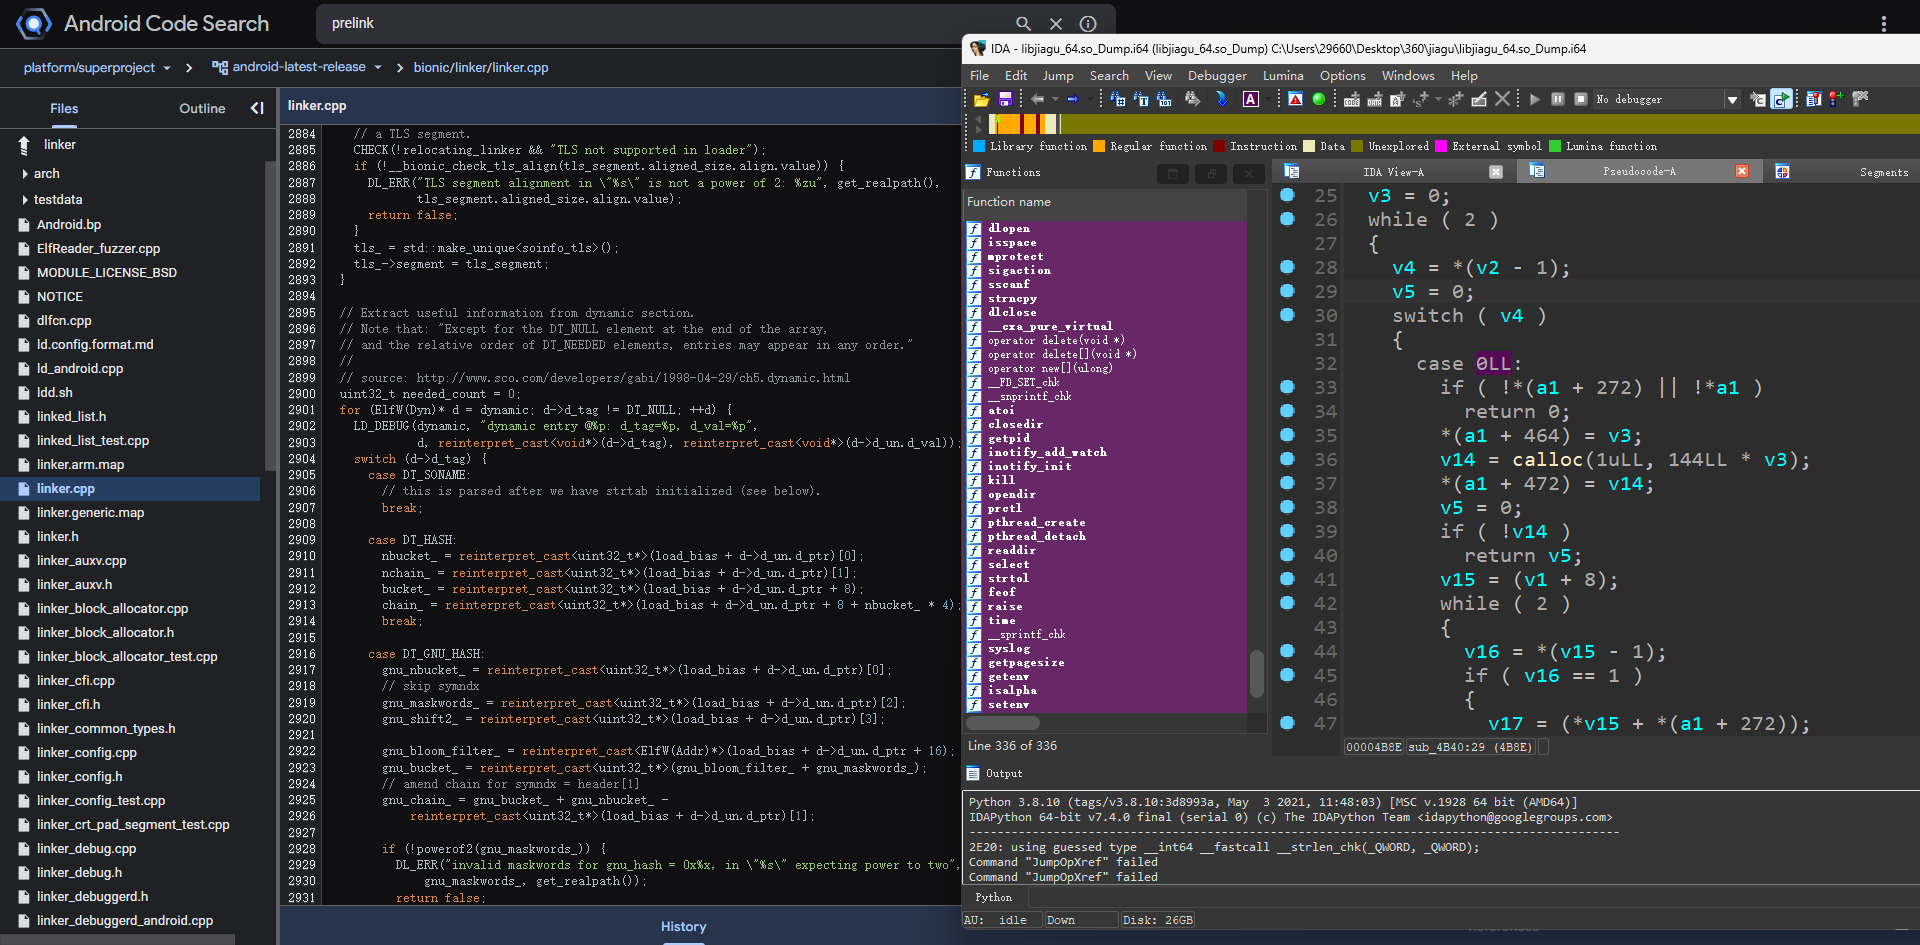
查看Android源码linker的预链接部分,同样也是大量的switch case结构
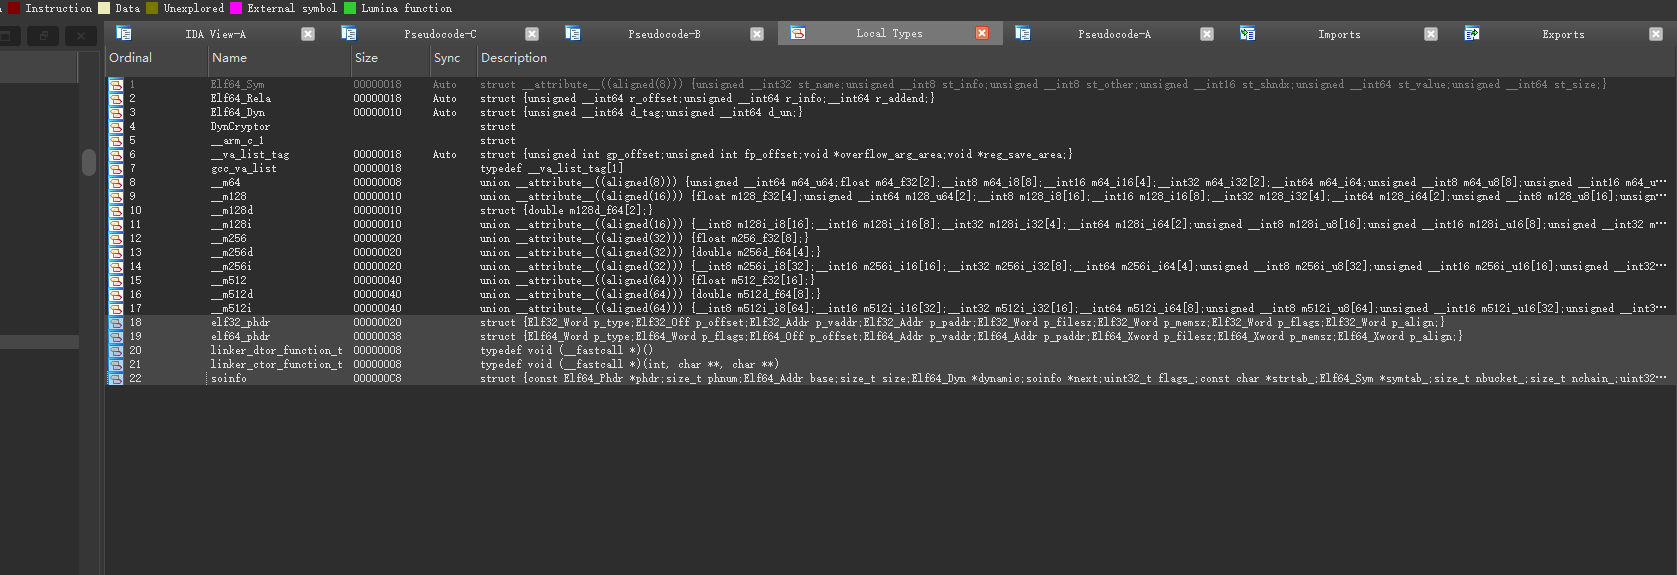
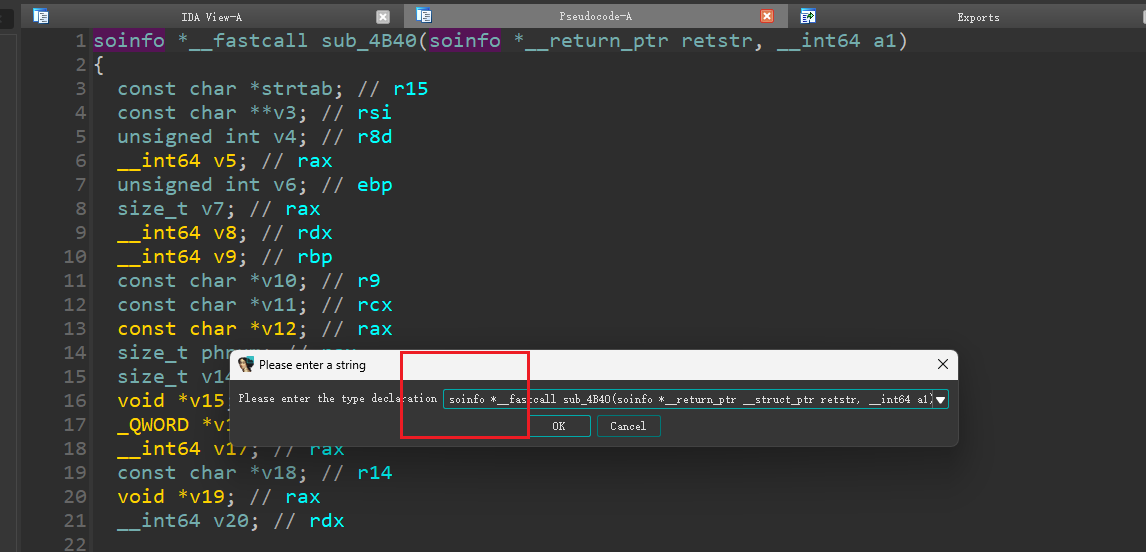
此时就可以在IDA中导入soinfo结构体了(结构体代码来自SWDD)
1 2 3 4 5 6 7 8 9 10 11 12 13 14 15 16 17 18 19 20 21 22 23 24 25 26 27 28 29 30 31 32 33 34 35 36 37 38 39 40 41 42 43 44 45 46 47 48 49 50 51 52 53 54 55 56 57 58 59 60 61 62 63 64 65 66 67 68 69 70 71 72 73 74 75 76 77 78 79 80 81 82 83 84 85 86 87 88 89 90 91 92 93 94 95 96 97 98 99 100 101 102 103 104 105 106 107 108 109 110 111 112 113 114 115 116 117 118 119 120 121 122 123 124 125 126 127 128 129 130 131 132 133 134 135 136 137 138 139 140 141 142 143 144 145 146 147 148 149 150 151 152 153 154 155 156 157 158 159 160 161 162 163 164 165 166 167 168 169 170 171 172 173 174 175 176 177 178 179 180 181 182 183 184 185 186 187 188 189 190 191 192 193 194 195 196 197 198 199 200 201 202 203 204 205 206 207 208 209 210 211 212 213 214 215 216 217 218 219 220 221 222 223 224 225 226 227 228 229 230 231 232 233 234 235 236 237 238 239 240 241 242 243 244 245 246 247 248 249 250 251 252 253 254 255 256 257 258 259 260 261 262 263 264 265 266 267 268 269 270 271 272 273 274 275 276 277 278 279 280 281 282 283 284 285 286 287 288 289 290 291 292 293 294 295 296 1 if defined (__LP64__)ElfW (type) Elf64 _ ## typeelse ElfW (type) Elf32 _ ## typeif defined (__LP64__)USE_RELA 1 Elf32 _Addr;Elf32 _Half;Elf32 _Off;Elf32 _Sword;Elf32 _Word;Elf64 _Addr;Elf64 _Half;Elf64 _SHalf;Elf64 _Off;Elf64 _Sword;Elf64 _Word;Elf64 _Xword;Elf64 _Sxword;Elf32 _Sword d_tag;Elf32 _Sword d_val;Elf32 _Addr d_ptr;Elf32 _Dyn;Elf64 _Sxword d_tag; Elf64 _Xword d_val;Elf64 _Addr d_ptr;Elf64 _Dyn;Elf32 _Addr r_offset;Elf32 _Word r_info;Elf32 _Rel;Elf64 _Addr r_offset; Elf64 _Xword r_info; Elf64 _Rel;Elf32 _Addr r_offset;Elf32 _Word r_info;Elf32 _Sword r_addend;Elf32 _Rela;Elf64 _Addr r_offset; Elf64 _Xword r_info; Elf64 _Sxword r_addend; Elf64 _Rela;Elf32 _Word st_name;Elf32 _Addr st_value;Elf32 _Word st_size;Elf32 _Half st_shndx;Elf32 _Sym;Elf64 _Word st_name; Elf64 _Half st_shndx; Elf64 _Addr st_value; Elf64 _Xword st_size; Elf64 _Sym;EI_NIDENT 16 EI_NIDENT ];Elf32 _Half e_type;Elf32 _Half e_machine;Elf32 _Word e_version;Elf32 _Addr e_entry; Elf32 _Off e_phoff;Elf32 _Off e_shoff;Elf32 _Word e_flags;Elf32 _Half e_ehsize;Elf32 _Half e_phentsize;Elf32 _Half e_phnum;Elf32 _Half e_shentsize;Elf32 _Half e_shnum;Elf32 _Half e_shstrndx;Elf32 _Ehdr;EI_NIDENT ]; Elf64 _Half e_type;Elf64 _Half e_machine;Elf64 _Word e_version;Elf64 _Addr e_entry; Elf64 _Off e_phoff; Elf64 _Off e_shoff; Elf64 _Word e_flags;Elf64 _Half e_ehsize;Elf64 _Half e_phentsize;Elf64 _Half e_phnum;Elf64 _Half e_shentsize;Elf64 _Half e_shnum;Elf64 _Half e_shstrndx;Elf64 _Ehdr;PF_R 0x4 PF_W 0x2 PF_X 0x1 Elf32 _Word p_type;Elf32 _Off p_offset;Elf32 _Addr p_vaddr;Elf32 _Addr p_paddr;Elf32 _Word p_filesz;Elf32 _Word p_memsz;Elf32 _Word p_flags;Elf32 _Word p_align;Elf32 _Phdr;Elf64 _Word p_type;Elf64 _Word p_flags;Elf64 _Off p_offset; Elf64 _Addr p_vaddr; Elf64 _Addr p_paddr; Elf64 _Xword p_filesz; Elf64 _Xword p_memsz; Elf64 _Xword p_align; Elf64 _Phdr;Elf32 _Word sh_name;Elf32 _Word sh_type;Elf32 _Word sh_flags;Elf32 _Addr sh_addr;Elf32 _Off sh_offset;Elf32 _Word sh_size;Elf32 _Word sh_link;Elf32 _Word sh_info;Elf32 _Word sh_addralign;Elf32 _Word sh_entsize;Elf32 _Shdr;Elf64 _Word sh_name; Elf64 _Word sh_type; Elf64 _Xword sh_flags; Elf64 _Addr sh_addr; Elf64 _Off sh_offset; Elf64 _Xword sh_size; Elf64 _Word sh_link; Elf64 _Word sh_info; Elf64 _Xword sh_addralign; Elf64 _Xword sh_entsize; Elf64 _Shdr;void (*linker_dtor_function_t)();void (*linker_ctor_function_t)(int, char**, char**);if defined (__work_around_b_24465209__)SOINFO_NAME_LEN 128 if defined (__work_around_b_24465209__)SOINFO_NAME_LEN ];const ElfW (Phdr )* phdr;if defined (__work_around_b_24465209__)ElfW (Addr ) unused0; ElfW (Addr ) base;if defined (__work_around_b_24465209__)ElfW (Dyn )* dynamic;if defined (__work_around_b_24465209__)const char* strtab_;ElfW (Sym )* symtab_;if !defined (__LP64__)ElfW (Addr )** unused4; if defined (USE_RELA )ElfW (Rela )* plt_rela_;ElfW (Rela )* rela_;else ElfW (Rel )* plt_rel_;ElfW (Rel )* rel_;
按Y将该函数类型改成so
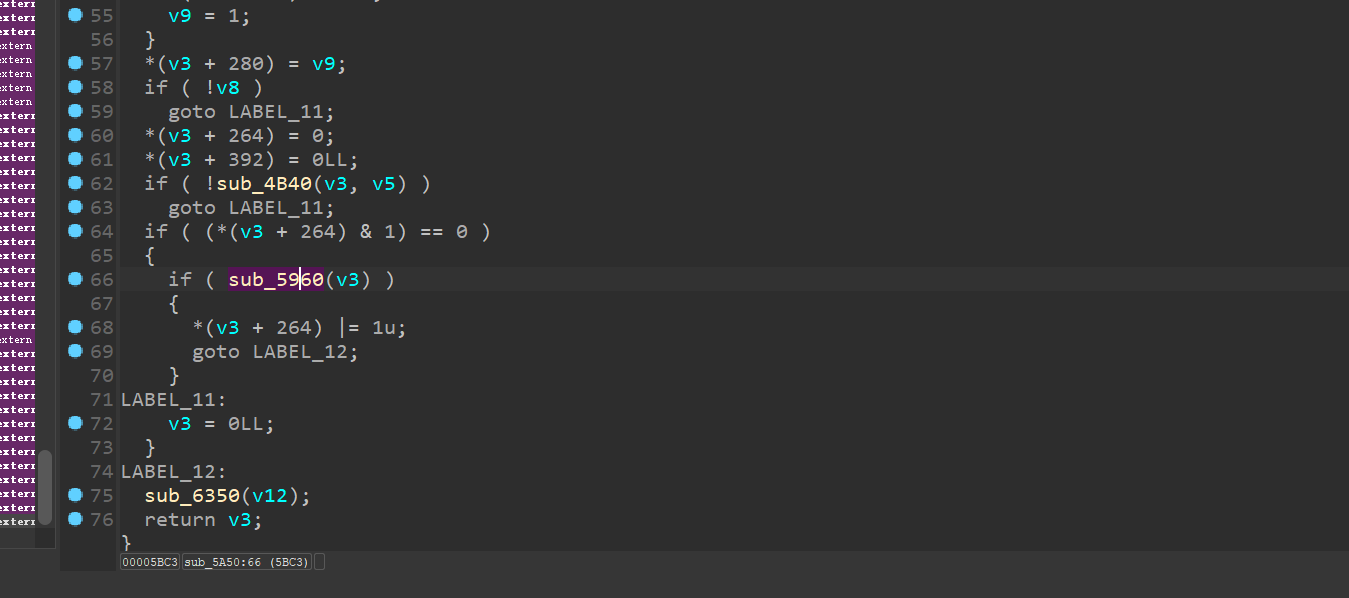
好看多了,但看着还是有点奇怪,可能这个soinfo被魔改过了
交叉引用一下,来到上一个函数,有这样一个函数,我们点进去看看
最终来到这个地方
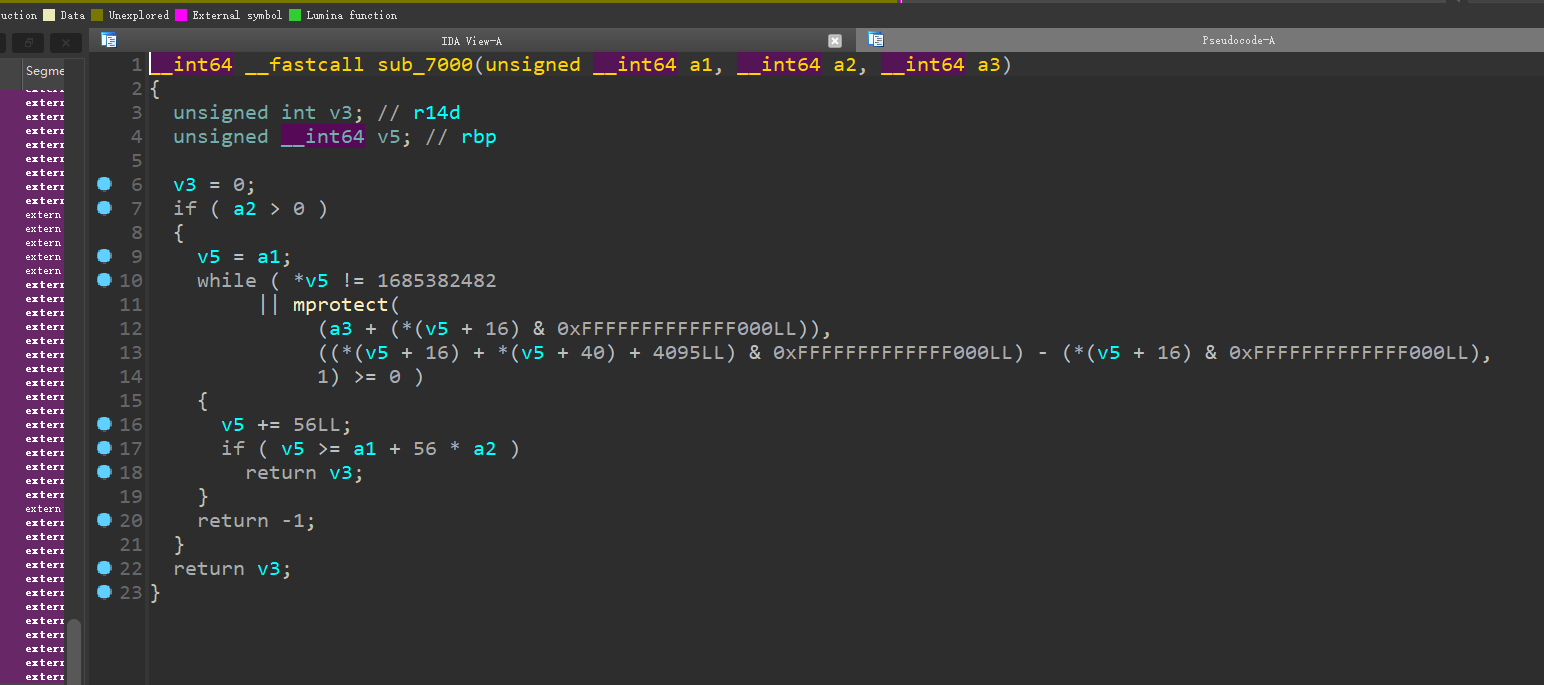
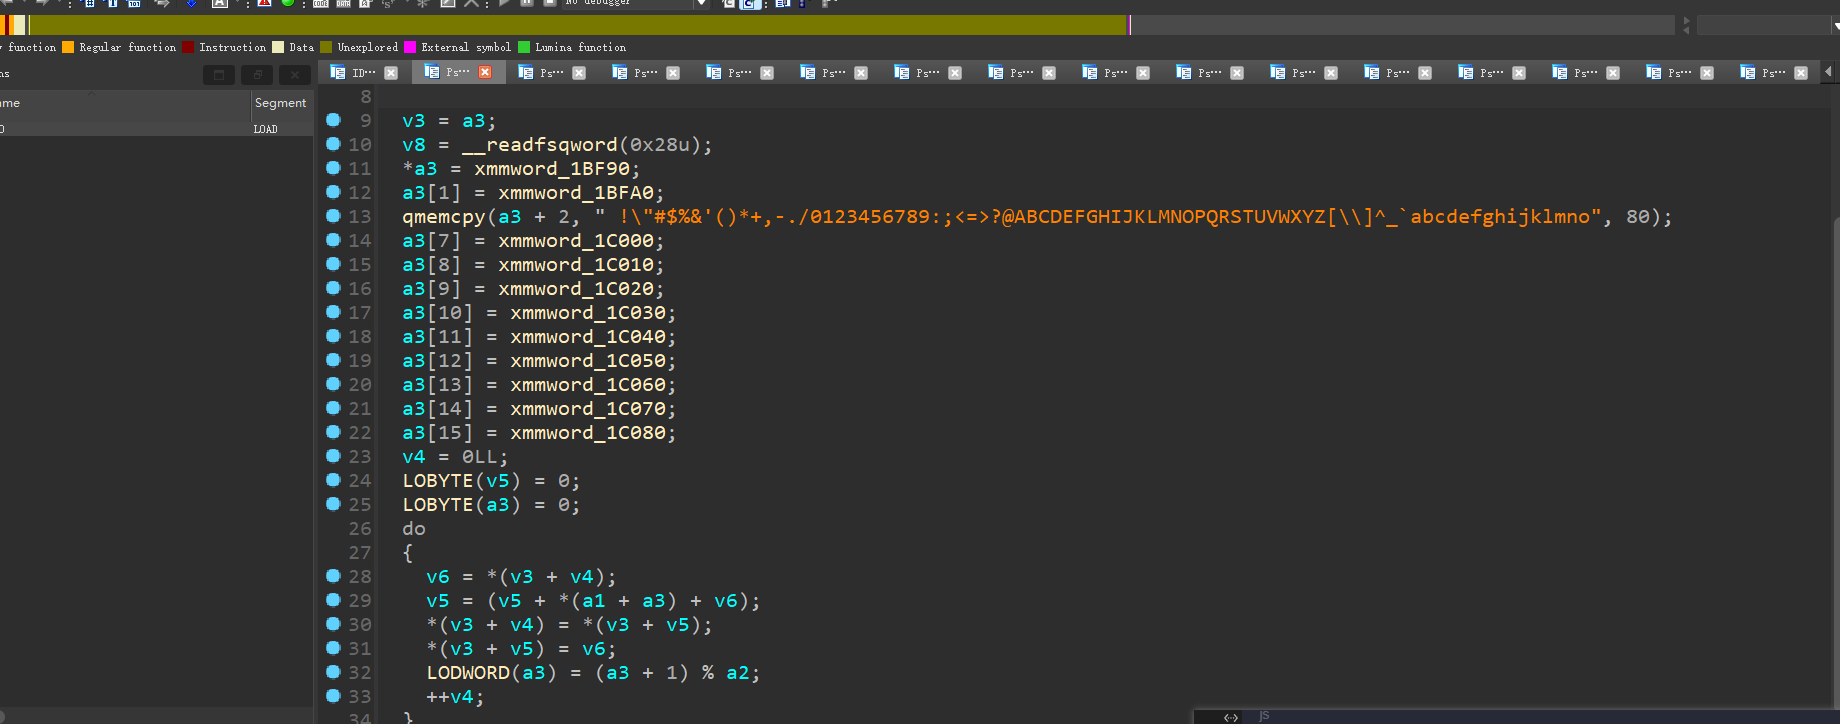
有一个很可疑的点是v5往上加了0x38
在ELF文件中,32 位 ELF 文件程序头大小是 0x20(32 字节),64 位 ELF 文件程序头大小是 0x38(56 字节)
这里正好就是0x38,所以这里可能就在加载程序头了。
既然要加载程序头,那么在加载之前肯定需要解密,往上引用一下,最后又来到这里,有点眼熟
还记得之前拿到的执行流么,从7000,即加载程序头的函数开始,往上找一找
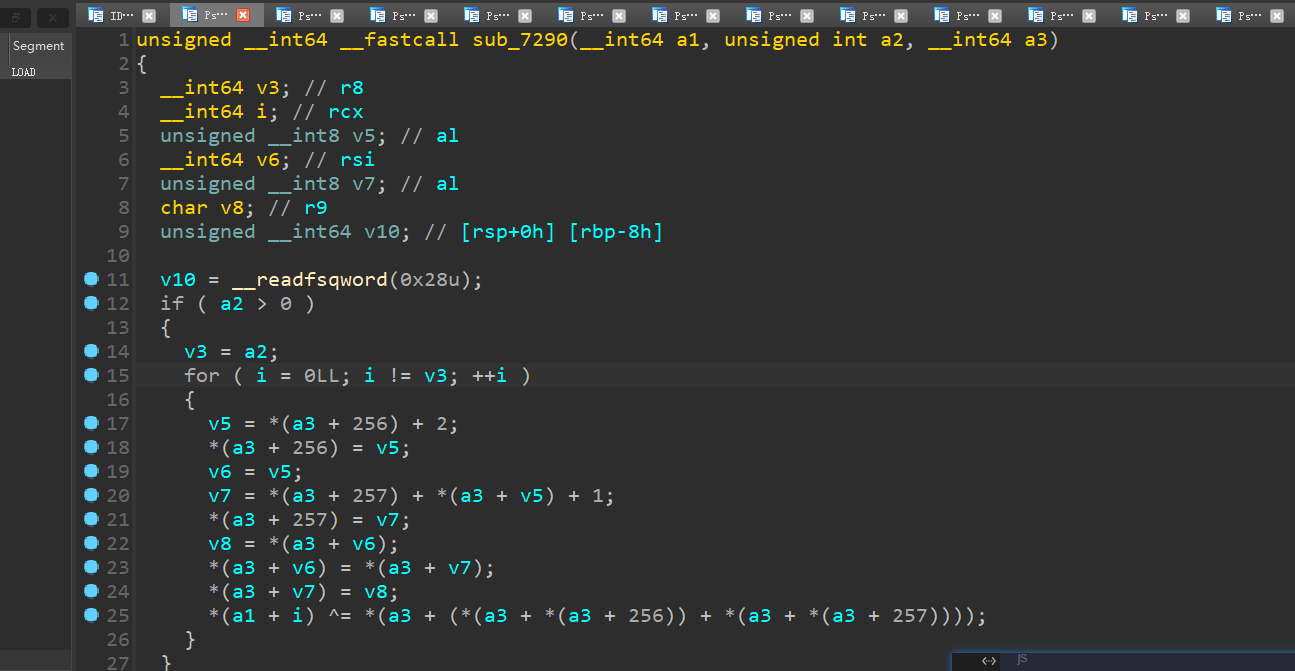
在50E0的位置发现这里加载了一些东西
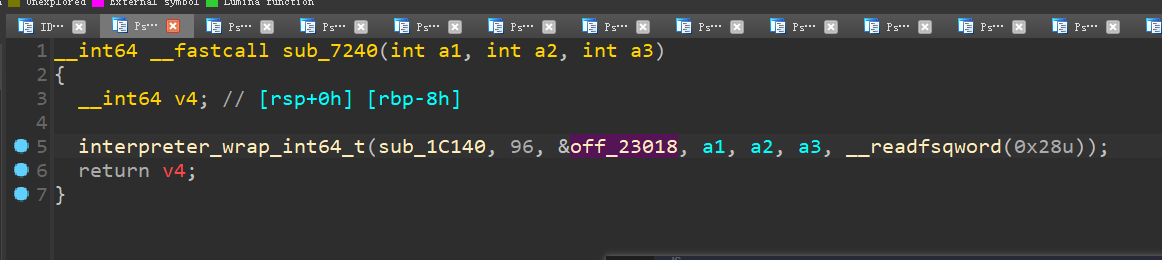
继续往上翻,在7240的位置填入了一个地址进去
去那个地址看一眼,AUV,这不rc4么
上面那个则是初始化算法
直接hook出sbox